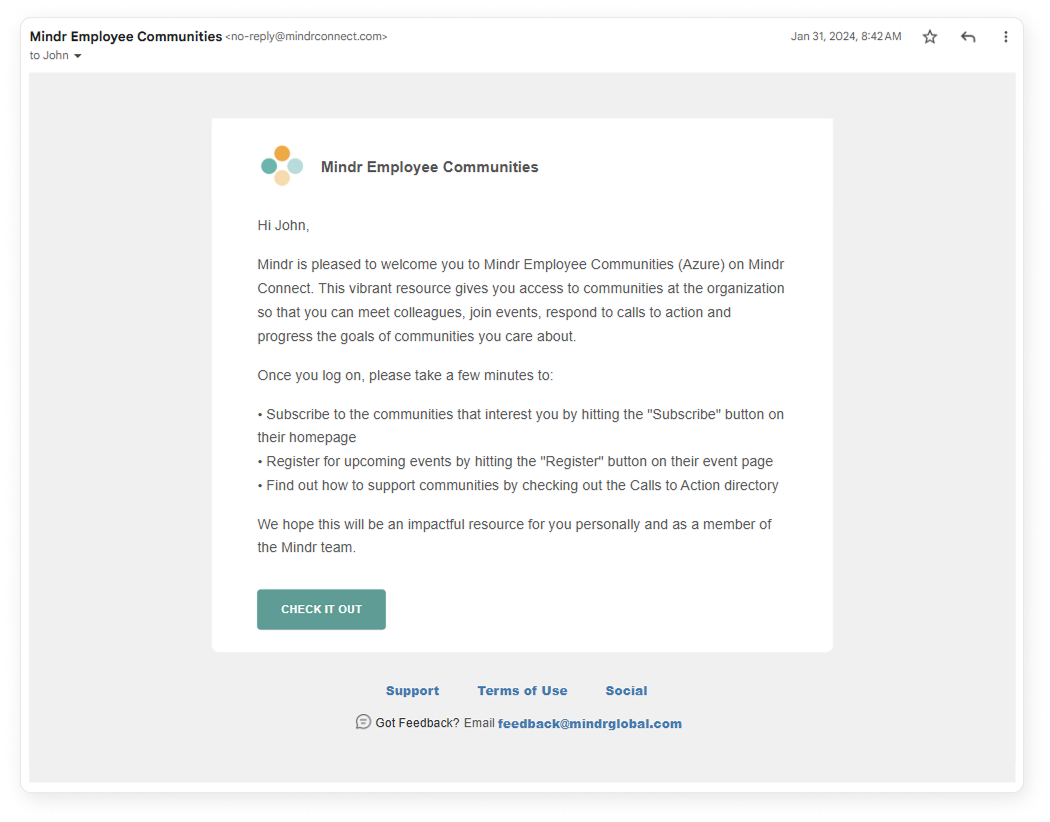
Guides & Resources

Everything you need to get started and beyond.
All Users
Updating your account

Updating your account

Set up your profile, update your information, or reset your password if needed

Joining communities and getting involved

Joining communities and getting involved

Learn how to subscribe, invite colleagues, and stay involved in your communities

Attending events

Attending events

Discover events, register, manage waitlists, and invite others to attend

Completing calls to action (CTAs)

Completing calls to action (CTAs)

Find CTAs that interest you, complete them, and invite colleagues to take action too

Tracking your activity and badges

Tracking your activity and badges

See your past actions, earned badges, and how to share your accomplishments

Leaders
Managing your communities

Managing your communities

Update your community, engage members, and send communications to your audience

Creating events for your community

Creating events for your community

Create, publish, and manage events, including sending invites and handling waitlists

Setting up CTAs for your community

Setting up CTAs for your community

Create, publish, and manage CTAs, including sending invites to a subset of users

Scheduling a committee meeting

Scheduling a committee meeting

Create and manage meetings, and view notes

Viewing community reports

Viewing community reports

Access engagement stats for your community

Organization Admins
Updating organization details

Updating organization details

Edit your org profile, branding, key contact, and email notification settings

Creating a new community

Creating a new community

Set up a new community, review it, and publish it to your organization

Managing users of your organization

Managing users of your organization

View user details, including roles, and invite new users to the platform

Creating a private cohort

Creating a private cohort

Set up a cohort and manage participations

Accessing organization reports

Accessing organization reports

Explore org-wide stats and track participation across communities and cohorts

Viewing LEADR™ Index results

Viewing LEADR™ Index results

View your users’ submitted assessments, how many users fall into each LEADR™ Profile, and what those profiles mean

Looking for something specific?
Search all help articles, or browse by topic below.
  • If you are having trouble logging in, click Forgot your password on the Sign-in page
  • Enter your associated work email address and click Reset Password
  • Follow the instructions delivered to your email
  • NOTES: This option applies only to organizations that do not use Single Sign On (SSO). If your organization uses SSO, use your identity provider’s password recovery flow or contact your organization’s administrator.
  • This is also located on the My Information page
  • Scroll to the Password section
  • Enter your current password, new password, and confirm your new password. Your new password must meet the required criteria.
  • Click Reset Password to save your changes
  • NOTES: This option applies only to organizations that do not use Single Sign On (SSO). If your organization uses SSO, passwords are managed by your identity provider and cannot be changed in the platform.
  • In the top right corner, click your profile picture icon (or the first letter of your name if you have not uploaded a photo)
  • In the left sidebar under My Profile, click My Information
  • On the My Information page, you can edit your name, pronouns, title, department, and location
  • Click Save 
  • Log into Mindr Connect using your Single Sign On provider
  • In the top right corner, click your profile picture icon (or the first letter of your name if you have not uploaded a photo)
  • On the left sidebar, click the large circle with your profile picture or first initial, next to your name and title
  • Upload a profile photo from your computer, and click Save
  • In the top right corner, click your profile icon (or the first letter of your name if you have not uploaded a photo)
  • On this Subscriptions page, you will see a list of all of the communities you are subscribed to
  • Opt out of emails by clicking Manage notifications 
    • Click the green toggle to turn email notifications off
  • Unsubscribe from communities by clicking Leave group
    • In the confirmation popup, click the Leave button to confirm

Once you're part of a community, here’s what you can do to get involved:

  • Attend events – Check out and register for events hosted by the community
  • Complete calls to action – Stay involved by exploring resources asynchronously
  • Get to know the leadership team – Reach out to the leaders with questions or ideas
  • View recommended resources – Browse helpful links or materials shared with the community

  • On the main dashboard, select your employee community, or click into Communities on the top menu
  • In the top right corner of the banner, click the transparent Invite Others button
  • In the text box, begin typing your colleague's name or email
  • Select your colleague's auto-populated profile
  • Add as many colleagues as you would like 
  • Click the green Submit button, and an invitation will be sent to their email inbox
  • Log into Mindr Connect using your Single Sign On provider
  • From the community dashboard, click the green “+ button on the bottom right corner of any community’s tile
  • From a specific community’s page, click the green Subscribe button in the top right corner
  • You can earn two badges by attending events:
    • Register for 5 events to earn the “Supporter” badge
    • Register for 10 or more events to earn the “Advocate” badge
  • In the top navigation bar, click Badges to view all available badges
  • To see each individual badge in a larger view, click the relevant View Badge button
  • Once a badge has been earned, you can share your achievement on LinkedIn by clicking Share Badge
  • You can learn more about each badge here
  • Navigate to the Events tab on the top menu of your dashboard
  • Select the event you'd like to invite colleagues to
  • In the top right corner of the banner, click the transparent Invite Others button
  • In the text box, begin typing your colleague's name or email
  • Select your colleague's auto-populated profile
  • Add as many colleagues as you would like 
  • Click the green Send Invitations button, and an email will be sent to their inbox
  • If you’re on the waitlist and a spot opens, everyone on the waitlist will receive the email at the same time
  • If you want to attend, click Register in the email as soon as possible to secure your spot, as spots are filled on a first-come first-serve basis
  • If you're on the My Dashboard or Events tab, and an event is full or registration has closed, the event card will show Join Waitlist instead of the usual “+” button
  • If you click into the event page, you’ll see a Join Waitlist button instead of the green Register button
  • Once you're on the waitlist, you'll automatically receive an email if a spot opens up
  • If you no longer want to stay on the waitlist, you can go back to the event page from the My Dashboard or Events tab, click into the event, and click Remove from Waitlist

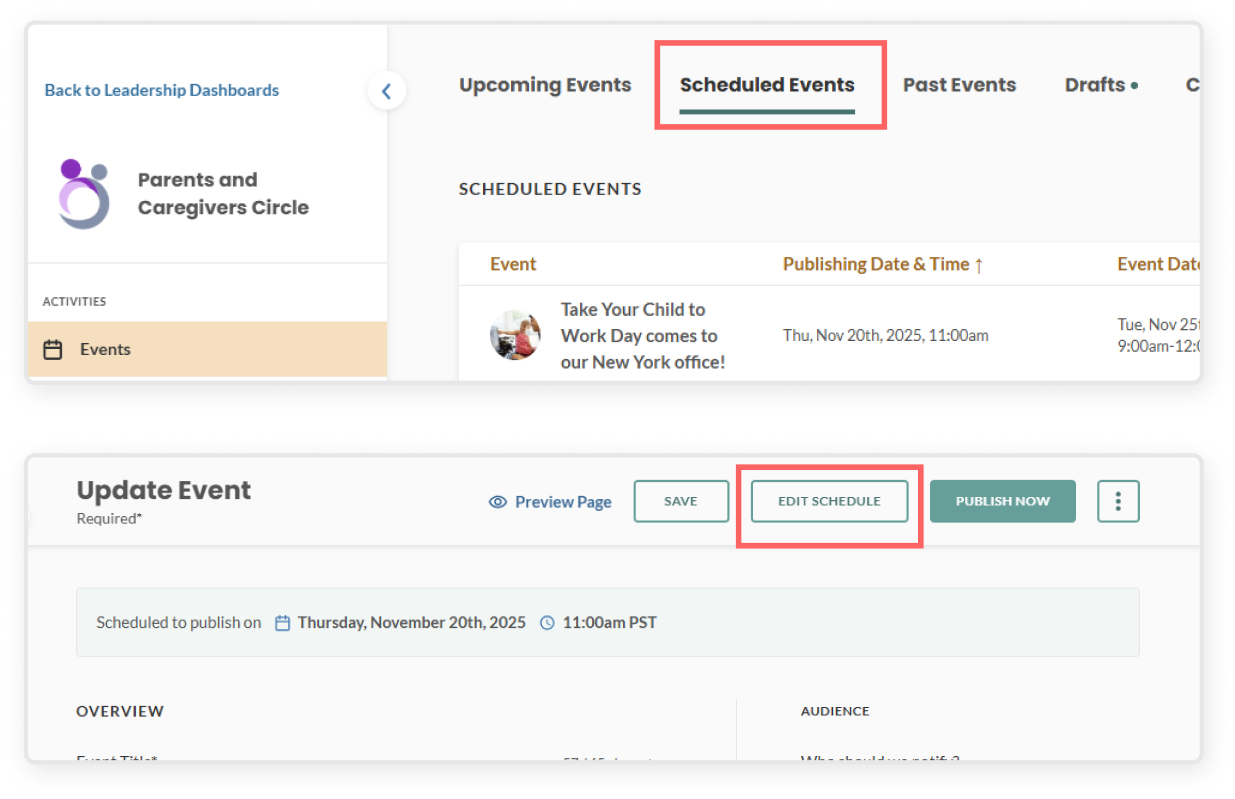
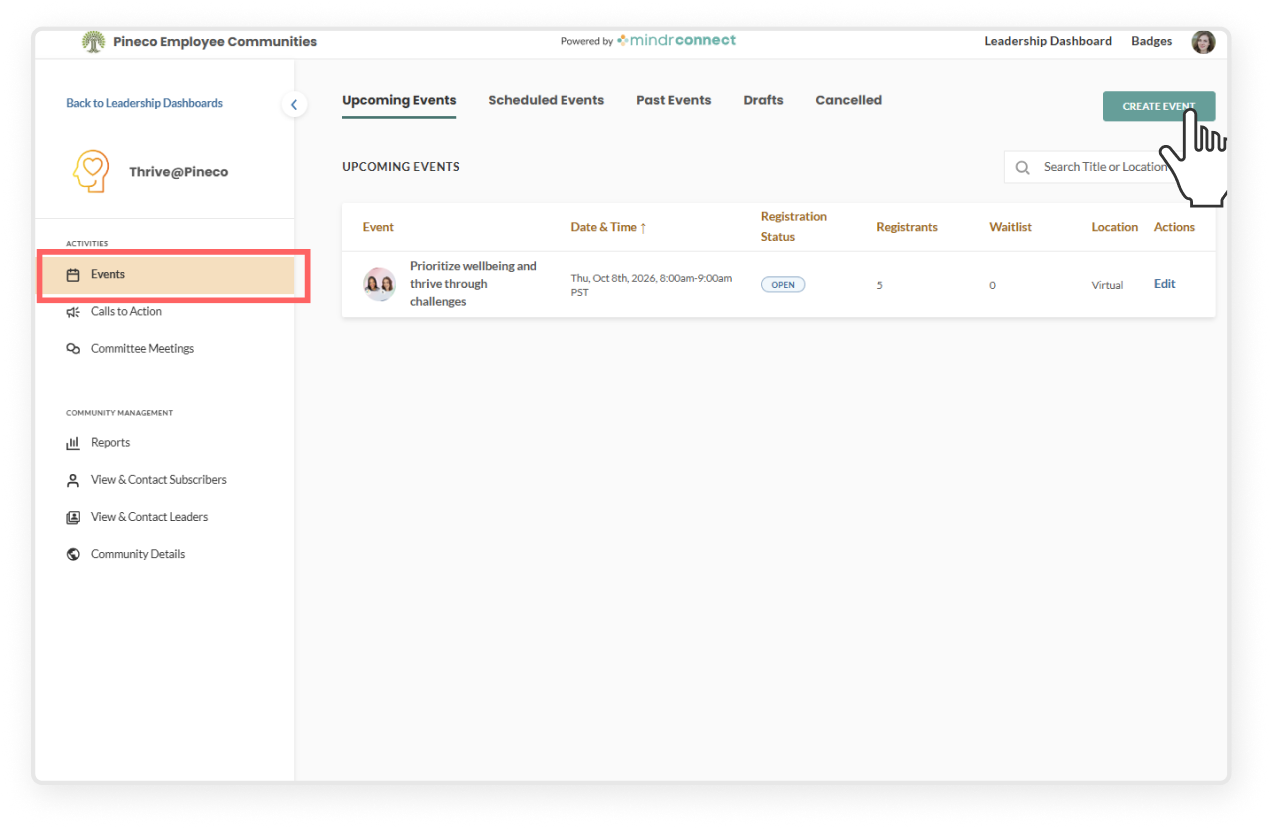
From your dashboard, click the Events tab and use the filters on the left side:

  • Toggle between “All” and “Mine” – Switching to “Mine” will show events hosted by communities you’re subscribed to
  • Filter by Groups – Select one or more communities to only see events from those specific groups
  • Filter by Dates – Choose a date range to narrow it down. Options include All dates, Next 30 days, or Next 7 days 
  • Filter by Locations – Pick one or more locations to view events happening in specific areas
  • If you are logged into Mindr Connect, you can head to the Events tab to see all upcoming events 
  • From there, click into the event and hit the transparent Cancel Registration button to unregister. Then, click Confirm. The event will also be removed from your calendar.
  • 🔔 NOTE: If there's an active waitlist for the event, canceling your registration will free up your spot, and someone on the waitlist may take your place
  • If you are subscribed to the community hosting the event, you may receive an email invitation. From that email, you can click the green Register button
  • If you are logged into Mindr Connect, find the event you want to attend
    • You can find the three events coming up next on My Dashboard, and register by clicking the green “+” button
    • Or go to the Events tab to see all upcoming events, and click the green “+” button
    • You can also click into the specific event page to see all event details, and click the green Register button in the top right of the banner
  • You may be prompted to submit questions for the speakers in advance
    • You can submit a question right away during registration. Make sure to click Submit.
    • Or you can head to the event page to submit a question by clicking the Submit Questions button at the top right corner, at any point before the event.
  • After registering, you will receive an email confirmation and the event will be automatically added to your calendar
  • 🔔 NOTE: Automatically registered: In some cases, leaders may automatically register all community subscribers for an event. If that happens, you'll get a confirmation email and  the event will be added to your calendar. You don't need to take any action unless you want to cancel your registration.

  • You can earn two badges by completing CTAs:
    • Complete 5 CTAs to earn the “Volunteer” badge
    • Complete 10 or more CTAs to earn the “Delegate” badge
  • In the top navigation bar, click Badges to view all available badges
  • To see each individual badge in a larger view, click the relevant View Badge button
  • Once a badge has been earned, you can share your achievement on LinkedIn by clicking Share Badge
  • You can learn more about each badge here
  • Navigate to the Calls to Action tab on the top menu of your dashboard
  • Select the CTA you'd like to invite colleagues to engage with
  • In the top right corner of the banner, click the transparent Invite Others button
  • In the text box, begin typing your colleague's name or email
  • Select your colleague's auto-populated profile
  • Add as many colleagues as you would like 
  • Click the green Send Invitations button, and an email will be sent to their inbox
  • From your dashboard, head to the Calls to Action tab and use the filters on the left side:
    • Toggle between “All” and “Mine” – Switching to “Mine” will show CTAs published by communities you’re subscribed to
    • Filter by Groups – Select one or more communities to only see CTAs from those specific groups
    • Filter by Time Commitment – Choose how much time you’re able to commit, such as 30 minutes or less, 1 hour or less, etc
    • Filter by Locations – Pick one or more locations to view CTAs relevant to specific geographic areas (note that many CTAs are intentionally global)
  • If you are subscribed to the community that published the Call to Action, you may receive an email notification about the post. From that email, you can view the details and click the green Mark as complete button
  • If you are logged into Mindr Connect, find the CTA you want to engage with
    • If on the My Dashboard or Calls to Action tab, click the green checkmark button
    • If on the specific CTA page, click the green Mark as complete button 
  • If you want to unmark a CTA as complete, click into the specific CTA page from either My Dashboard or the Calls to Action tab. Once on the CTA page, click the green Mark as Incomplete button

To share badges you've earned on LinkedIn:

  1. Click the Share Badge button next to the badge you'd like to share
  2. In the confirmation popup, click the Share button to post it to your LinkedIn profile
  3. From there, you will be directed to LinkedIn. Click Share in a post
  4. If you’d like, customize your message, then click Post to share with your network
  • Badges recognize your engagement across the platform – whether you're attending events, completing calls to action, submitting questions, inviting others, or leading a community
  • Each badge has its own earning criteria, which you can view by clicking on the badge itself
  • You can learn more about each badge here
  • In the top right corner, click Badges next to your profile icon
  • You’ll see any badges you’ve earned, along with your progress toward the ones you haven’t earned yet
  • You can also click View Badge to open and see a larger version of each badge, even if you haven’t earned it yet
  • You can learn more about each badge here
  • In the top right corner, click your profile icon (or the first letter of your name if you have not uploaded a photo)
  • In the left sidebar, under the My Profile section, click Upcoming Activities to see upcoming events you have registered for
  • Click Past Activities to see events you have attended and CTAs you have completed
  • Please get confirmation from all current leaders and org admins before adding new leaders or removing leaders, as this will affect their admin permission levels
  • Click Leadership Dashboard in the top right corner
  • Select the community
  • On the left sidebar, click View and contact leaders and the transparent Edit Leaders button
    • Alternatively, you can navigate to the Community Details tab and scroll down to the leadership team section
  • To add leaders, click Add Leaders and search for the individual’s name
    • Note: adding leaders will grant them admin access to all community activities, including events, calls to action, committee meetings, reports, subscriber lists, etc 
  • To remove leaders, click the trash can icon after the leader’s email address
  • You can also update leadership roles and titles here
  • You can earn 2 badges for being a community leader
    • Lead a community to earn the “Community Leader” badge
    • Lead two or more communities to earn the “Intersectional Leader” badge
  • To see each individual badge in a larger view, click the relevant View Badge button
  • Once a badge has been earned, you can share your achievement on LinkedIn by clicking Share Badge
  • You can learn more about each badge here
  • Click Leadership Dashboard in the top right corner
  • Select the community
  • On the left sidebar, click View and contact subscribers
    • Filter the subscriber list by locations, title, department, or even specific names if necessary
  • Click the green Batch Email button and compose your message, including a subject line, body text, and attachments as relevant
  • Click the green Send button to deliver the email to selected subscribers
  • Click Leadership Dashboard in the top right corner
  • Select the community
  • On the left sidebar, click View and contact subscribers
    • Filter the subscriber list by locations, title, department, or even specific names if necessary
  • To see the list of subscribers who have joined recently, click the tab New in Past 2 Weeks
  • If enabled by your organization, you may also be able to download a copy of the table by clicking Export.csv 
  • Click Leadership Dashboard in the top right corner
  • Select the community
  • Click View and contact leaders on the left sidebar
    • Filter the subscriber list by locations, title, department, or even specific names if necessary
  • Click the green Batch Email button and compose your message, including a subject line, body text, and attachments as relevant
  • Click the green Send button to deliver the email to all leaders
  • Click Leadership Dashboard in the top right corner (or Settings if you are an Organization Admin)
  • Select the community
  • On the left sidebar, under Community Management, click Community Details 
  • Here you can edit all of the details on the community homepage, including:
    • Community Name
    • Logo
    • Thumbnail image
    • Banner image
    • Subtitle
    • Mission statement
    • Communication channel
  • Featured images
    • You must upload at least two photos in order to save without errors
    • Once you add the image and caption, you may drag and drop to reorder the images
  • Leadership team
    • Please get confirmation from all current leaders and org admins before adding new leaders or removing leaders, as this will affect their admin permission levels
    • You may also choose to add roles/titles associated with each leader (e.g. Chair, Secretary, Treasurer, etc.) for more specificity
  • Recommended resources
    • Click Add recommended resources to expand
    • Select a resource type (link or document)
    • Enter a name for the resource
    • Depending on the resource type, either paste a link or upload a document
    • You can drag and drop to reorder how the resources appear in the list
  • To edit an event, you can either:
    • Click the Edit button directly from the event table
    • Or click into the event to open the event overview page, then select the green Edit button in the top-right corner
    • Important: After editing key details such as location, time, or date, clicking Save will notify all attendees by email with the updated event details.
  • To cancel the event or update registration status:
    • Select the event you want to manage
    • From the event overview page, select the three-dot kebab menu in the top right corner to open the menu
      • Cancel Event – This will cancel the event entirely, remove it from users’ dashboards and calendars, and send an email notification to all invited subscribers
      • Close Registration – This prevents further registrations, but still allows users to join the waitlist. A note will appear in the Activity Log section of the event overview page: “Name: [Name], Action: Closed”
      • Re-open Registration – Re-opens signups if registration was previously closed due to a deadline, capacity limit, or manually by a leader. This can be found in the three-dot kebab menu as it replaces the “Close Registration”

  • Click into the event. From the event overview page, select the three-dot kebab menu in the top-right corner to open the menu:
    • Send to Additional Audience – Target specific locations, job titles, or departments to invite additional users to your event.
    • Email attendees – Compose and send a custom follow-up email to everyone who has already registered. This can be helpful to ask registrants of an event with a waitlist to cancel their registration if they can no longer attend, so spots open up for those hoping to attend.
    • Send RSVP reminder – Send a reminder invitation to all subscribers who have not yet registered for the event.
    • 🔔 NOTE: If you're added as a leader to a new community that already has live events with the audience set to All subscribers as the audience, you'll be automatically registered for those events. This means you'll immediately receive confirmation emails for each of them.

  • Click Leadership Dashboard in the top right corner
  • Select your community
  • On the left sidebar, click Events 
  • At the top, go to the Scheduled Events tab
  • Select the event you want to edit 
  • Click Edit Schedule in the blue banner
  • In the schedule editing modal, you can:
    • Update the date or time it is scheduled to publish
    • Remove the scheduled publish
  • You can also click Publish Now if you want it published immediately
  • Click Save to confirm your changes

  • Click Leadership Dashboard in the top right corner
  • Select your community
  • On the left sidebar, click Events 
  • In the top menu bar, click the Drafts tab
  • Select the specific event, which will open edit view
    • Important: be aware that once you hit "Publish," all subscribers of your community will receive an email notification inviting them to the event. Be sure to review thoroughly to ensure that your event draft is complete before publishing.
  • Click the green Publish button, read the prompt reminding you that a notification will be sent, click the second Publish button
  • Return to the Active Events tab to view the live event and track registrations, pre-submitted questions, communication logs, etc.

  • Click Preview Page to see how your page will look when published
    • Make sure you have added all required fields before publishing
  • Once you're happy with it, save or publish:
    • Save as Draft will save your work to the "drafts" tab, which other leaders of the community can access and collaborate on
    • Schedule Publish allows you to set a specific time and date for the content to be published
    • Publish Now publishes the content immediately, and sends email notifications to the selected audience

  • On the right side panel, go to Registration section
  • Set an event deadline
    • Event registration automatically closes at a designated date and time, automatically triggering the waitlist to open
  • Set a maximum capacity 
    • Event registration automatically closes when attendance reaches the capacity limit, automatically triggering the waitlist to open
  • 🔔 NOTE: If an event has reached its maximum capacity and a waitlist is active, increasing the capacity on the event update page will send an email notification to waitlisted users letting them know that more spots are available. Waitlisted users must register manually to secure a spot; they will not be automatically moved off the waitlist.

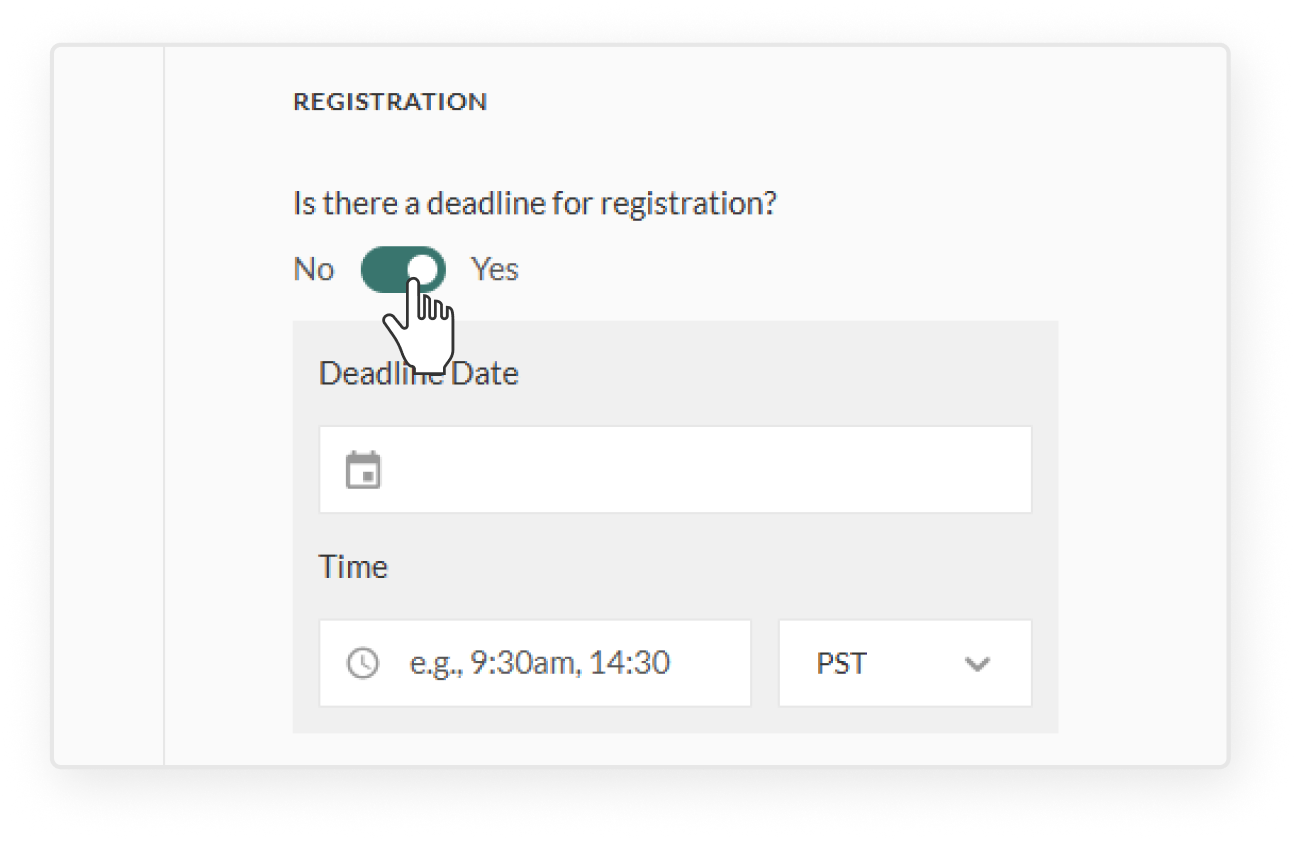
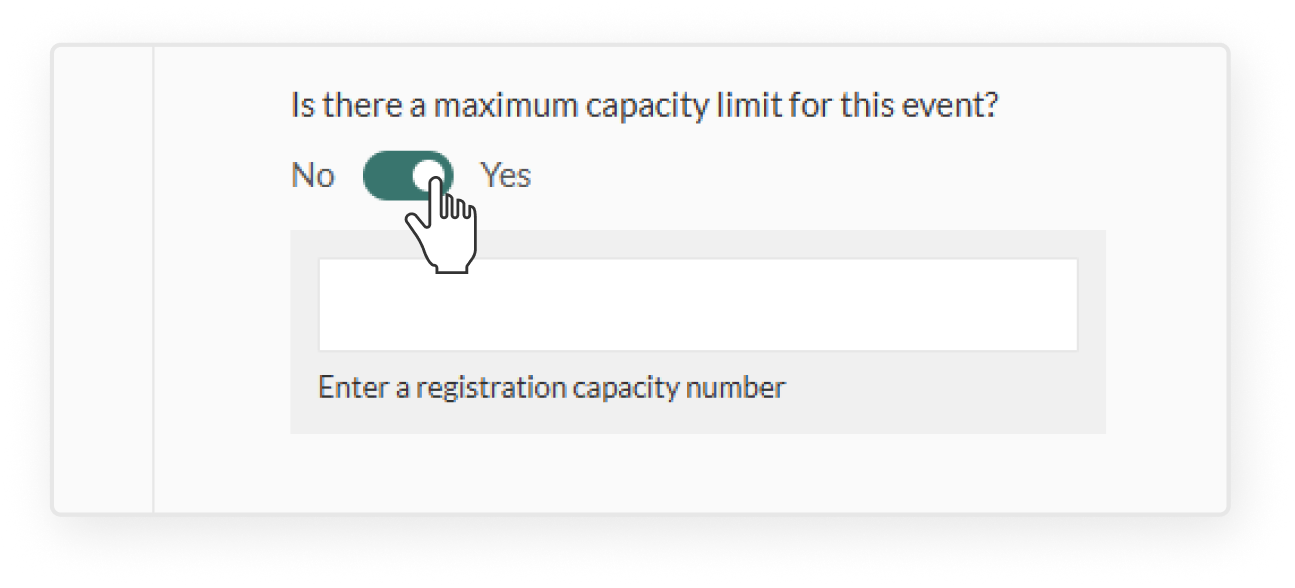
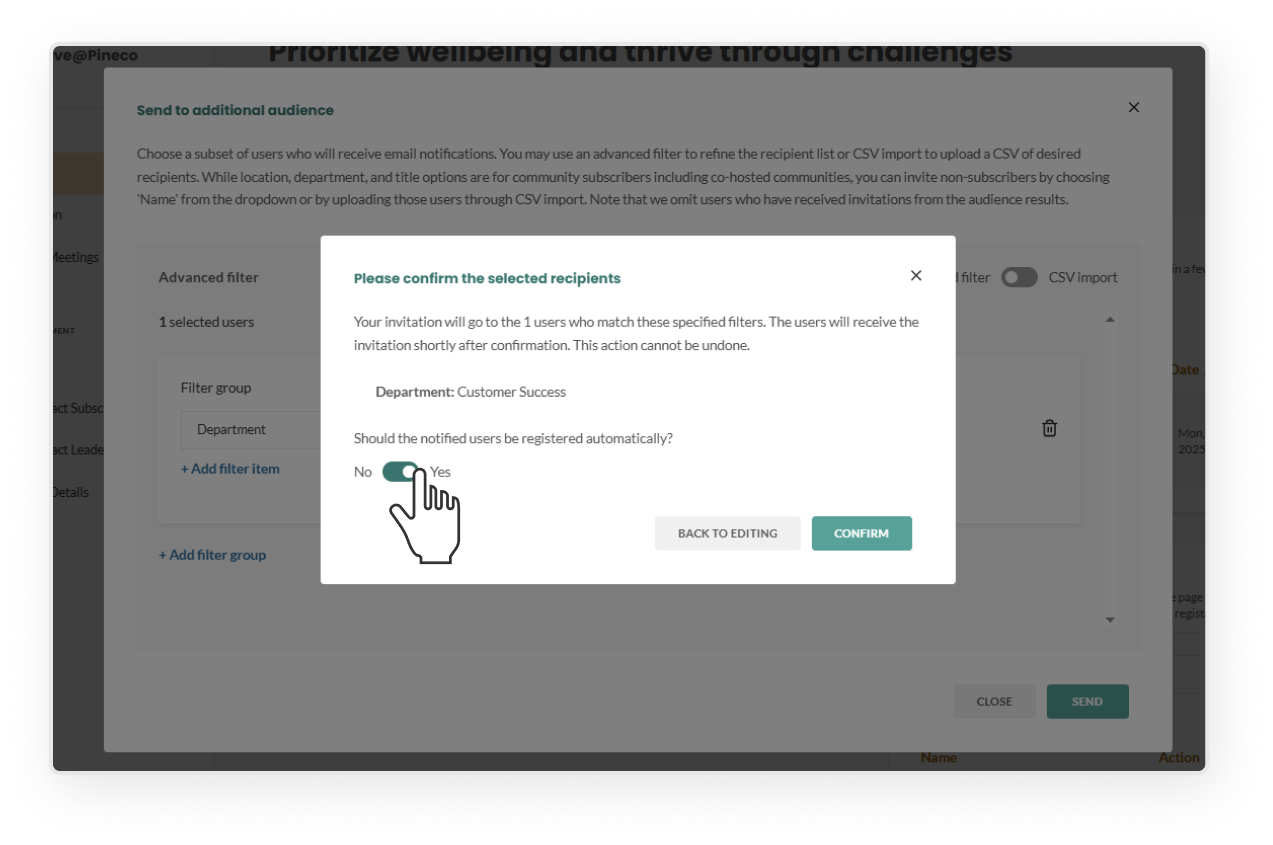
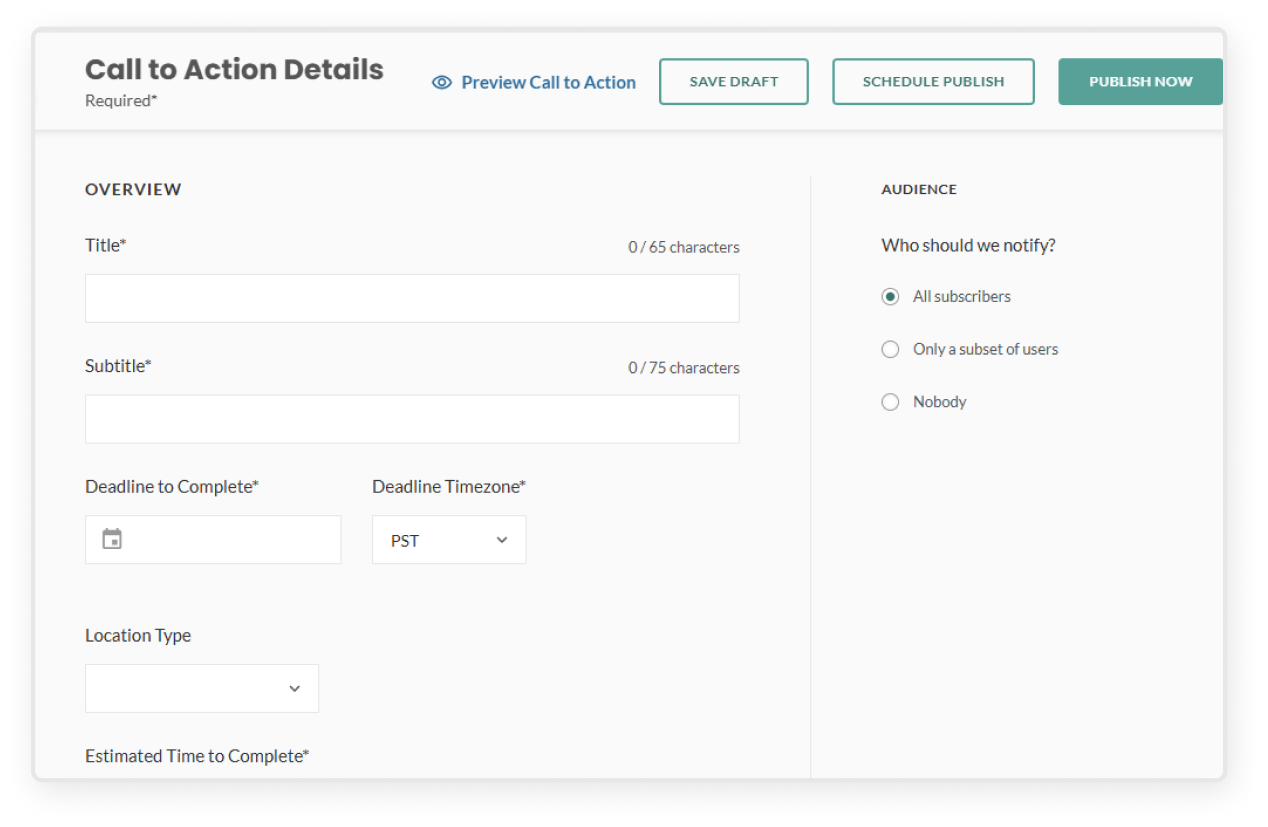
In the Audience section, after selecting your audience, you can choose to automatically register the selected users instead of sending them an invitation.

  • Toggle “Should the notified users be registered automatically?” under the Audience section
  • Once the event is published, users will be automatically registered. Their event will appear as “Registered” in their dashboard and the event will be added to their calendar
  • After publishing:
    • Selected users will be automatically registered
    • Go to the event overview page by clicking the event row
    • In the Activity Log on the right, click the specific log entry to see who was registered
    • 🔔 Note: You won’t be able to edit this audience once the event is published. However, if you need to register another subset of users, you can go to the three dot kebab menu and select Send to Additional Audience, then toggle on auto-register from the confirmation page.

  • In the event creation page, go to the Audience section in the right sidebar, select Only a subset of users
  • Use advanced filters
    • Select a filter group (e.g. location, title, department, or name)
    • In the contains field, enter specific values. You can multi-select items in this field
    • Click Add filter item to include more options in the same group – for example, if you want users who are in both Location: New York and Department: Engineering
    • Click Add filter group to create a separate set of filters – for example, if you want to invite users who are either in Location: New York or in Department: Engineering
    • Click Save to review the list of users who will be invited, then click Confirm
    • To make changes before publishing, click Edit next to Only a subset of users
  • Import recipients via CSV
    • Toggle the CSV import 
    • Download the sample template and follow the required format
    • Upload your file
      • Review to cross-reference how many users were successfully added and if there were any errors
      • Click the error link to download and view reasons for failed uploads
      • To remove the file, click the "X" next to the uploaded file and confirm in the modal
      • Upload a corrected file and click Save
    • On the confirmation modal, click Confirm – this will replace any filters you set using Advanced Filters
  • After publishing:
    • Selected users will receive the invitation immediately
    • Click the event to open the event overview page
    • In the Communication Log on the right, click the specific log entry to see who was invited
    • 🔔 NOTE: You won’t be able to edit this audience after publishing
      • To invite a different subset of users, click the three-dot kebab menu and select Send to Additional Audience.
      • Subscribers who have already been invited will not receive another invitation
        • If everyone in the audience has already been invited, the Selected Users count will display 0
      • You can follow the same steps using Advanced Filters or CSV Import to invite additional audiences
      • If a user has already been invited, you can nudge them instead by using the Send Reminder option
  • Click the green Create Event button (or open an exisitng event in Drafts)
  • In the event creation page, go to the Audience section in the right sidebar
  • Select the audience you would like to notify about the event
    • All subscribers sends an email invitation to all subscribers of your community upon publishing
    • Only a subset of users allows you to filter by location, title, department, name, or import a CSV of specific emails to receive notifications. (Learn how it works in the section below: “Invite a subset of users to an event”)
    • Nobody publishes the event to the Mindr Connect dashboard, but does not send any email notifications
  • If you would like to automatically register the selected audience, toggle on “Should the notified users be registered automatically?” (Learn how it works in the section below: “Register a subset of users to an event”)

  • Click Leadership Dashboard in the top right corner
  • Select the community and click Events on the left sidebar
  • Click the green Create Event button
  • Complete the required fields
    • Title (name of event)
    • Subtitle (engaging sub-heading)
    • Date/Time
    • Location (dial-in link or physical address)
    • Event description 
      • This will be the body of the email and main text of the event page, and should include all relevant information and details about the event. You have full rich text editing capabilities, such as creating headings, bolding, italicizing, underlining, adding bulletpoint lists, hyperlinks, etc.
    • Upload an image (optional: Add image caption)
  • Scroll down to the Additional Details section. These fields are optional, but they help make your event more engaging and informative.
    • + Add event cohosts: You can add co-hosts, which will give that community’s leadership team complete edit access to the event, and send an invitation to that group’s subscriber base. Be sure to get permission from the relevant leadership teams before adding cohosts.
    • + Add event speakers: Add name, title, organization, bio, and a photo for each speaker. If you add a speaker, you must upload a photo to successfully save the event.
    • + Add run of show: Use this section to build the run of show for your event. If you check “Show on Invitation,” the item will be added to the public agenda for the event. Leave this box unchecked for items such as sound check that should only be visible to event organizers.
    • + Add materials for attendees: Use this section to add documents or links you want attendees to check out. You can drag and drop to reorder the materials using the icon at the front.
    • + Add post-event survey (Highly recommended): Enable this to automatically send a short feedback survey to all registrants after the event. We highly recommend enabling the post-event survey to collect feedback from registrants, which will be visible in the “Reports” tab.
  • To edit a CTA, you can either:
    • Click the Edit button directly from the CTA table
    • Or click into the CTA to open the CTA overview page, then select the green Edit button in the top-right corner
  • To cancel and remove the CTA:
    • Select the CTA you want to edit 
    • From the CTA overview page, select the three-dot kebab menu in the top right corner to open the menu
      • Cancel Call to Action – This will cancel the CTA entirely, remove it from the Mindr Connect dashboard, and send a cancellation email to all subscribers who completed the CTA. If a user attempts to view the CTA from their email, they will receive an error message.
  • To remove a CTA without notification: 
    • Select the CTA you want to edit
    • Change the date to today’s date. The content will expire at the end of the day and no users will be notified of the change.
  • Select the CTA you want to send emails regarding
  • From the CTA overview page, select the three-dot kebab menu in the top-right corner to open the menu:
    • Send to Additional Audience – Target specific locations, job titles, or departments to invite additional users to your CTA
    • Email completers – Send a message to those who have already completed the CTA
    • Send CTA reminder – Re-send the invitation to all subscribers who have not yet completed the call to action
  • Click Leadership Dashboard in the top right corner
  • Select your community
  • In the left sidebar, click Calls to Action
  • At the top, go to the Scheduled CTAs tab
  • Select the Call to Action you want to edit 
  • Click Edit Schedule in the blue banner
  • In the schedule modal, you can:
    • Update the date or time it is scheduled to publish
    • Remove the scheduled publish
  • You can also click Publish Now if you want it published immediately
  • Click Save to confirm your changes
  • Click Leadership Dashboard in the top right corner
  • Select your employee community
  • In the left sidebar, click Calls to Action
  • In the top menu bar, click the Drafts tab
  • Select the specific CTA, and edit fields as needed
    • Important: be aware that once you hit Publish all subscribers of your community will receive an email notification alerting them that there is a new CTA to view. Ensure that your CTA is totally complete before publishing.
  • Click the green Publish button, read the prompt reminding you that a notification will be sent, click the second Publish button
  • Return to the Active Calls to Action tab to view the live CTA
  • Click Preview Page to see how the CTA will look when published
    1. Make sure you have added all the required fields before publishing
  • Once you're happy with it, save or publish:
    1. Save as Draft will save your work to the "drafts" tab, which other leaders of the community can access and collaborate on
    2. Schedule Publish allows you to set a specific time and date for the content to be published
    3. Publish Now publishes the content immediately, and sends email notifications to the selected audience
  • Click the green Create CTA button
  • Start by filling out all required event details
  • Go to the Audience section in the right sidebar, select Only a subset of users
  • Use advanced filters
    • Select a filter group (e.g. location, title, department, or name)
    • In the contains field, enter specific values. You can multi-select items in this field
    • Click Add filter item to include more options in the same group – for example, if you want users who are in both Location: New York and Department: Engineering
    • Click Add filter group to create a separate set of filters – for example, if you want to invite users who are either in Location: New York or in Department: Engineering
    • Click Save to review the list of users who will be notified, then click Confirm
    • To make changes before publishing, click Edit next to Only a subset of users
  • Import recipients via CSV
    • Toggle to the CSV import 
    • Download the sample template and follow the required format
    • Upload your file to see how many users were successfully added and if there were any errors
    • Click the error link to download and view reasons for failed uploads
    • To remove the file, click the "X" next to the uploaded file and confirm in the modal
    • Upload a corrected file and click Save
    • On the confirmation modal, click Confirm – this will replace any filters you set using Advanced Filters
  • After publishing:
    • Selected users will receive the notification immediately
    • Click the CTA you want to open the CTA overview page
    • In the Communication Log on the right, click the specific log entry to see who was notified
    • 🔔 Note: You won’t be able to edit this audience after publishing, but you can notify another group by going to the three-dot kebab menu and selecting Send to Additional Audience

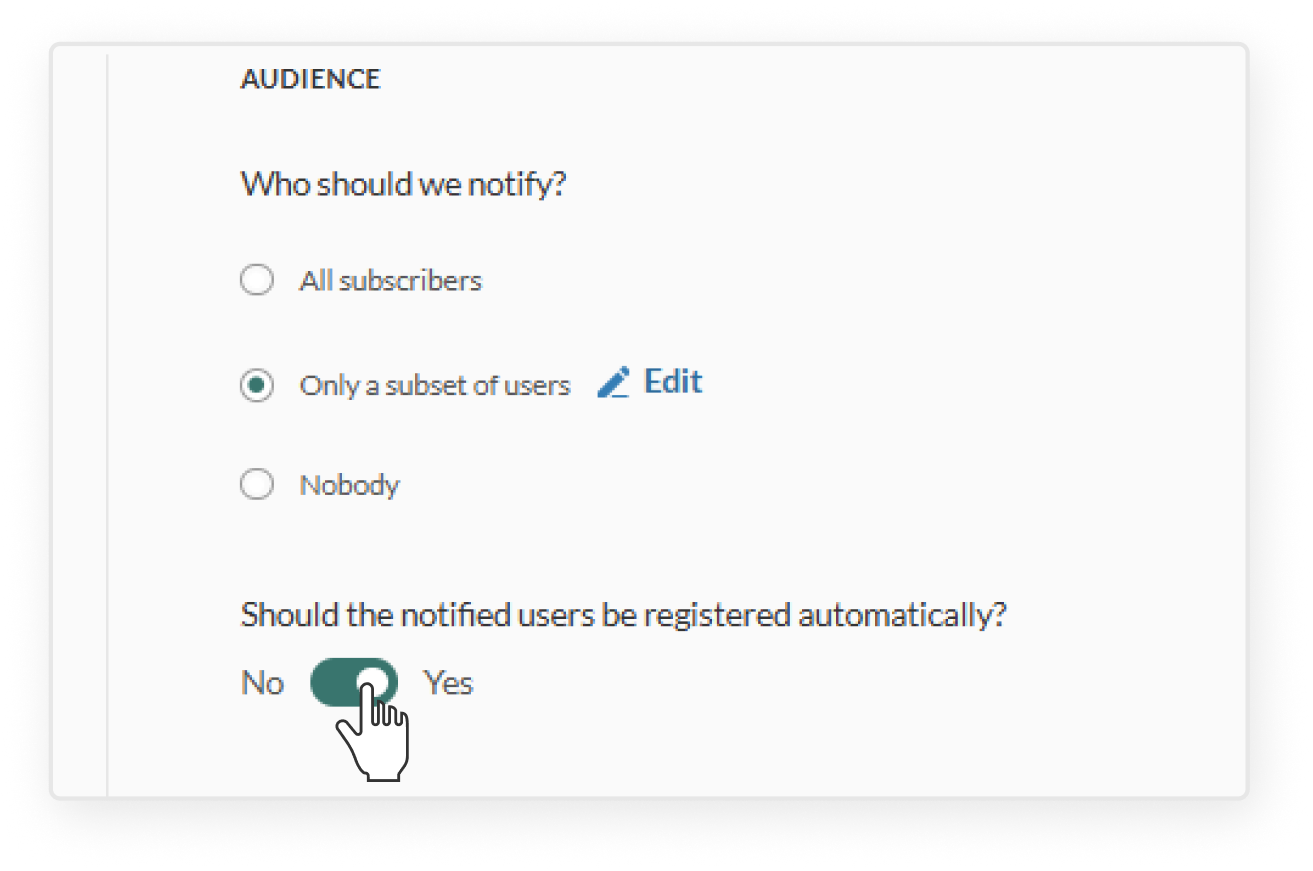
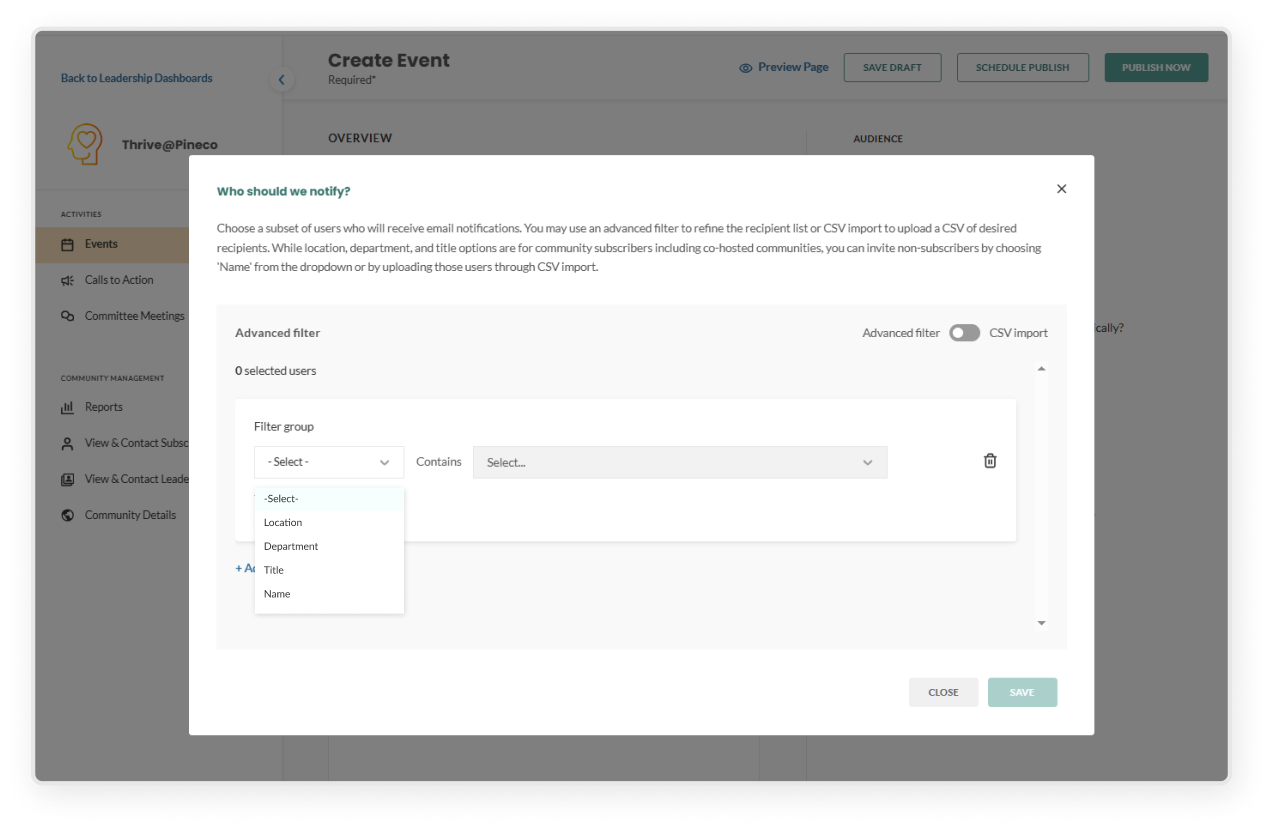
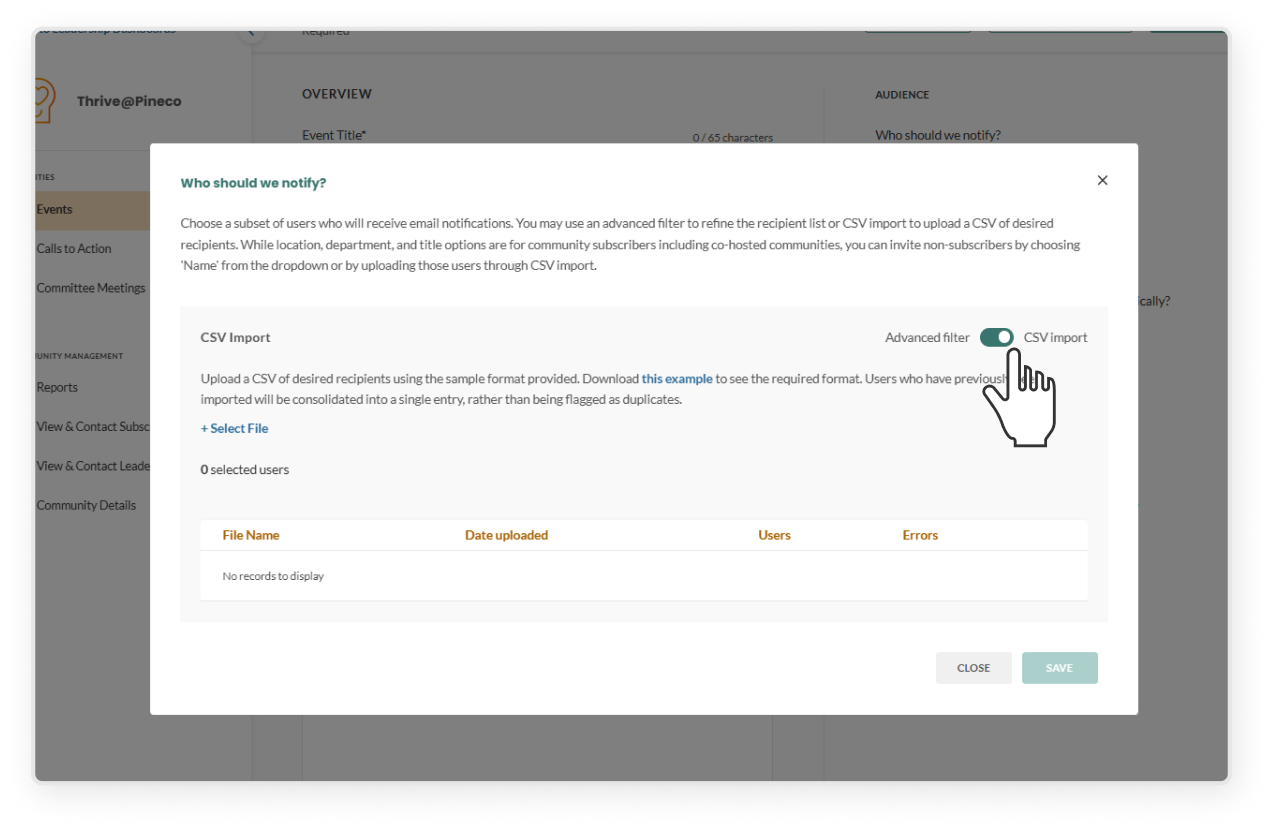
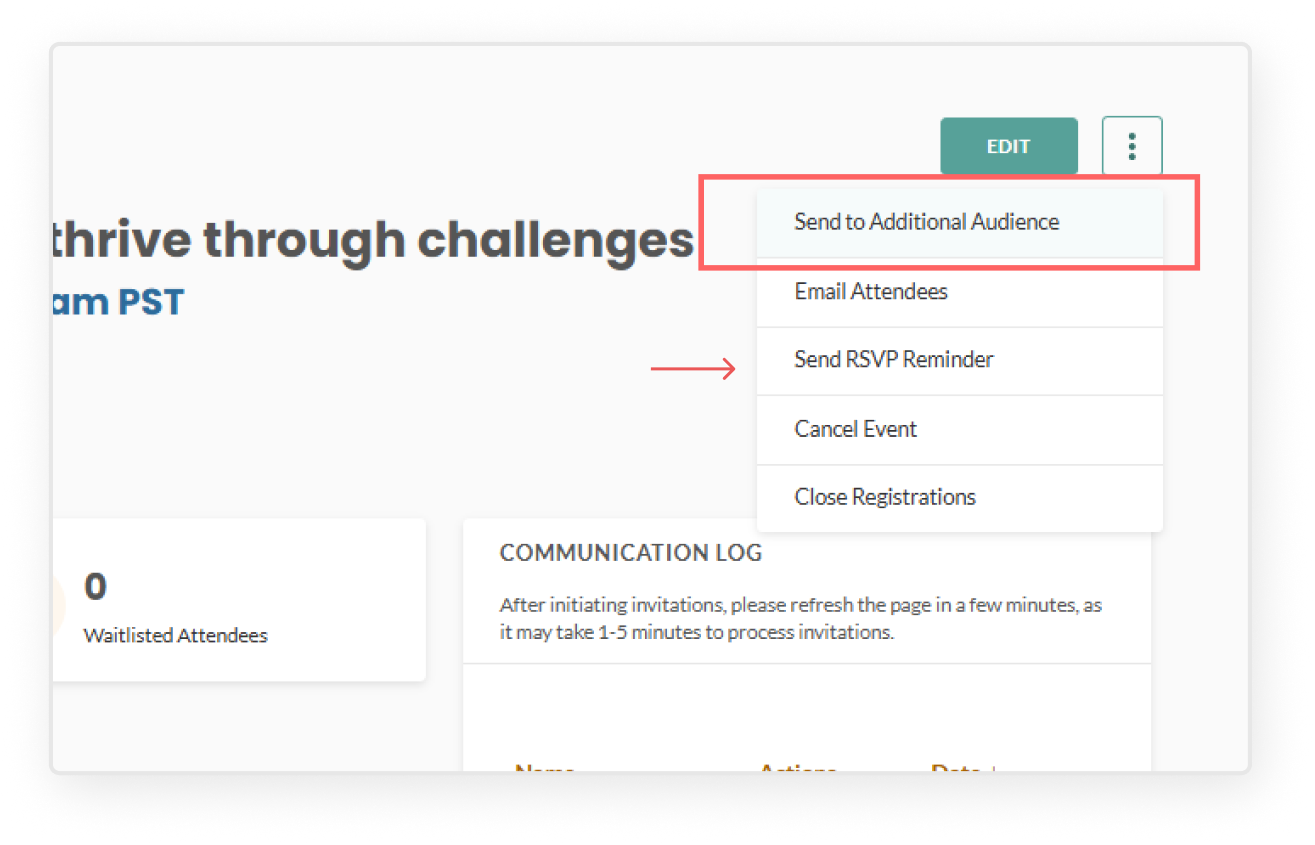
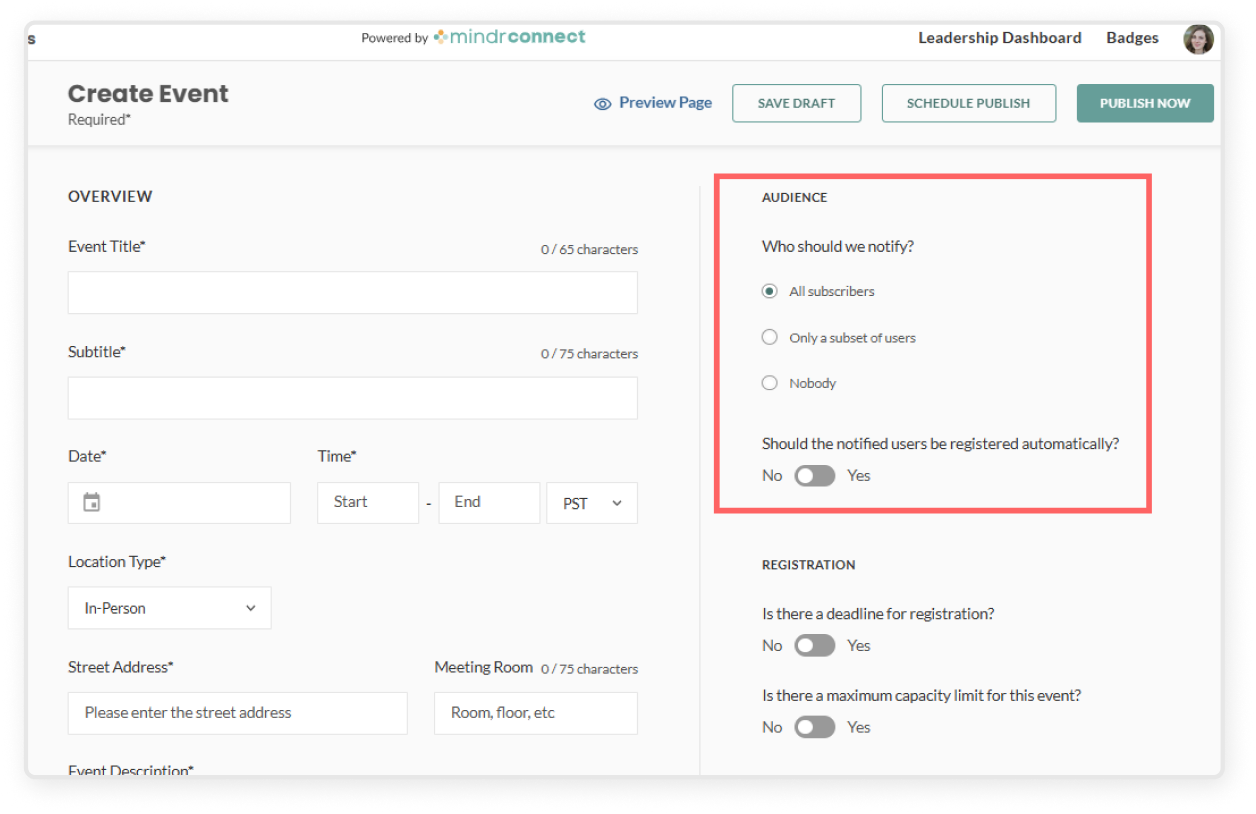
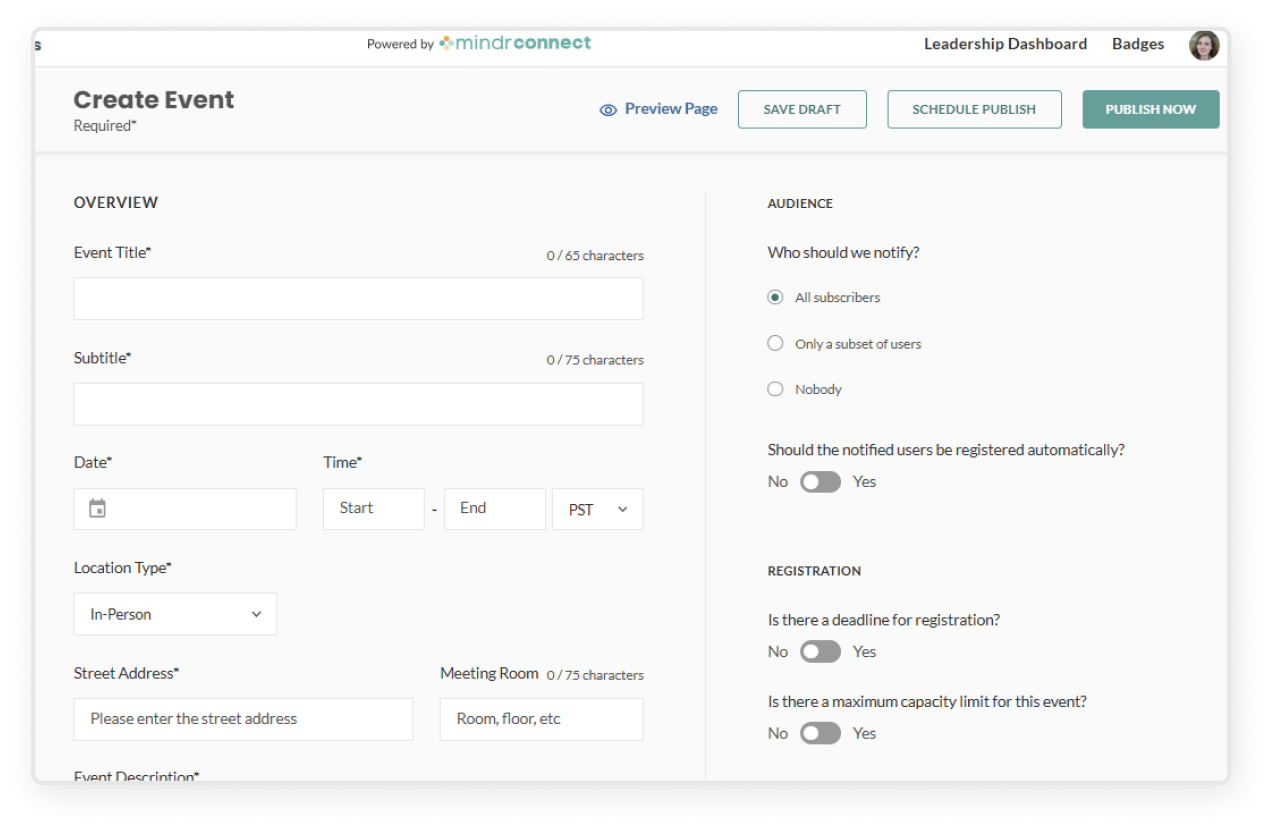
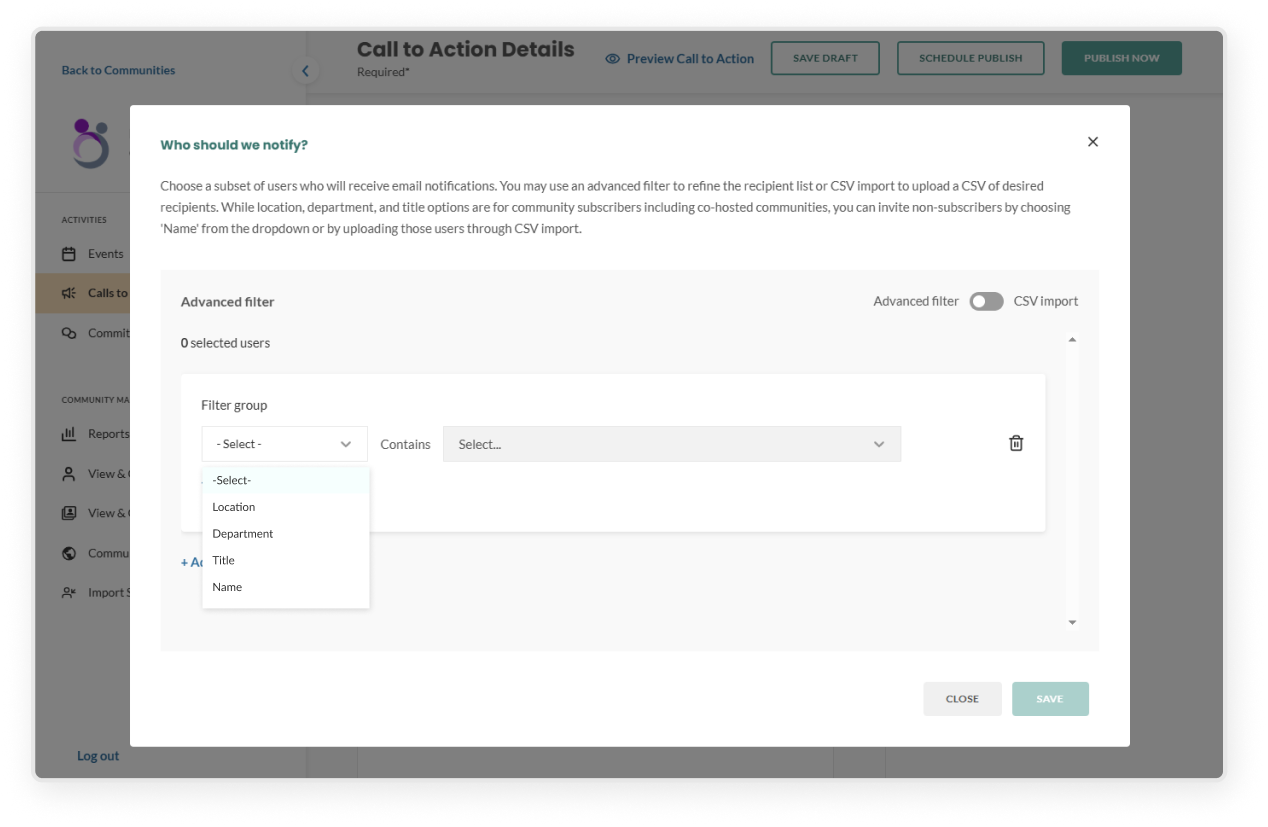
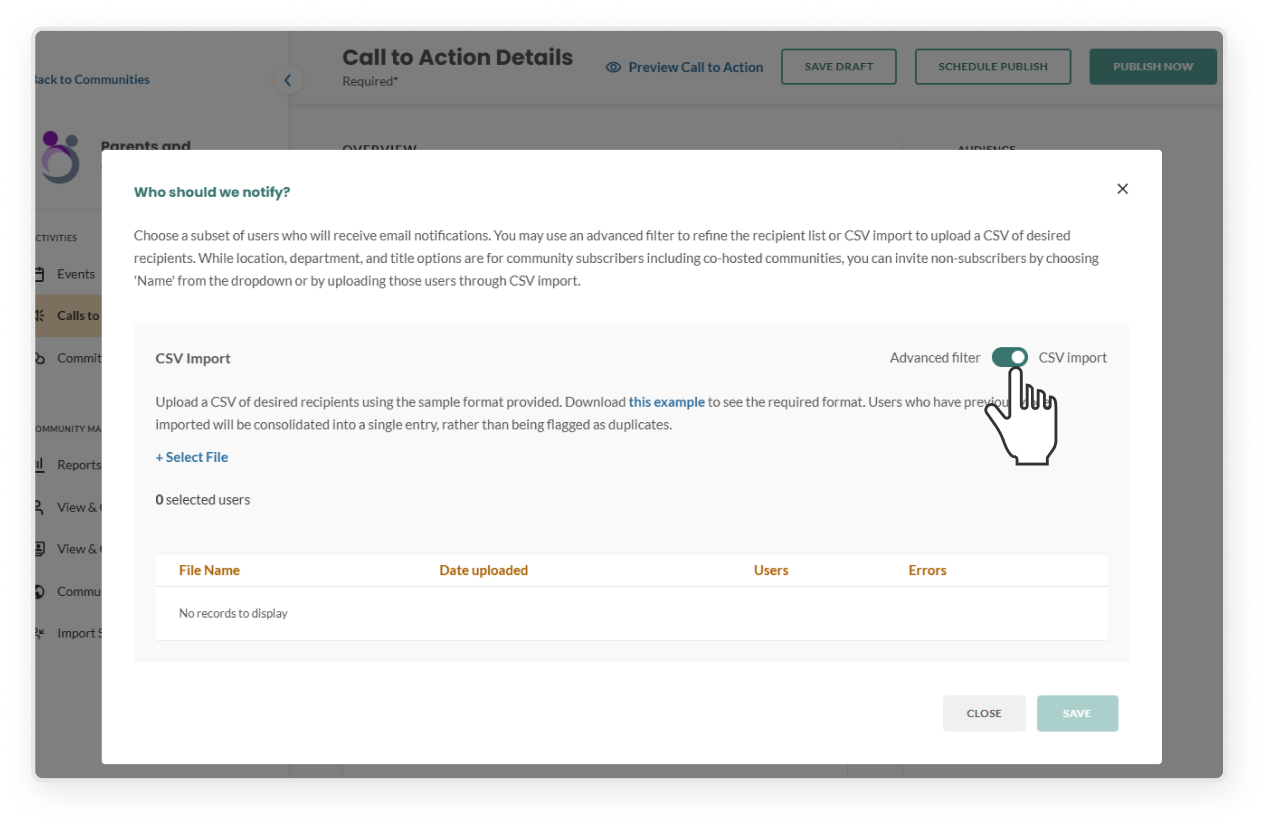
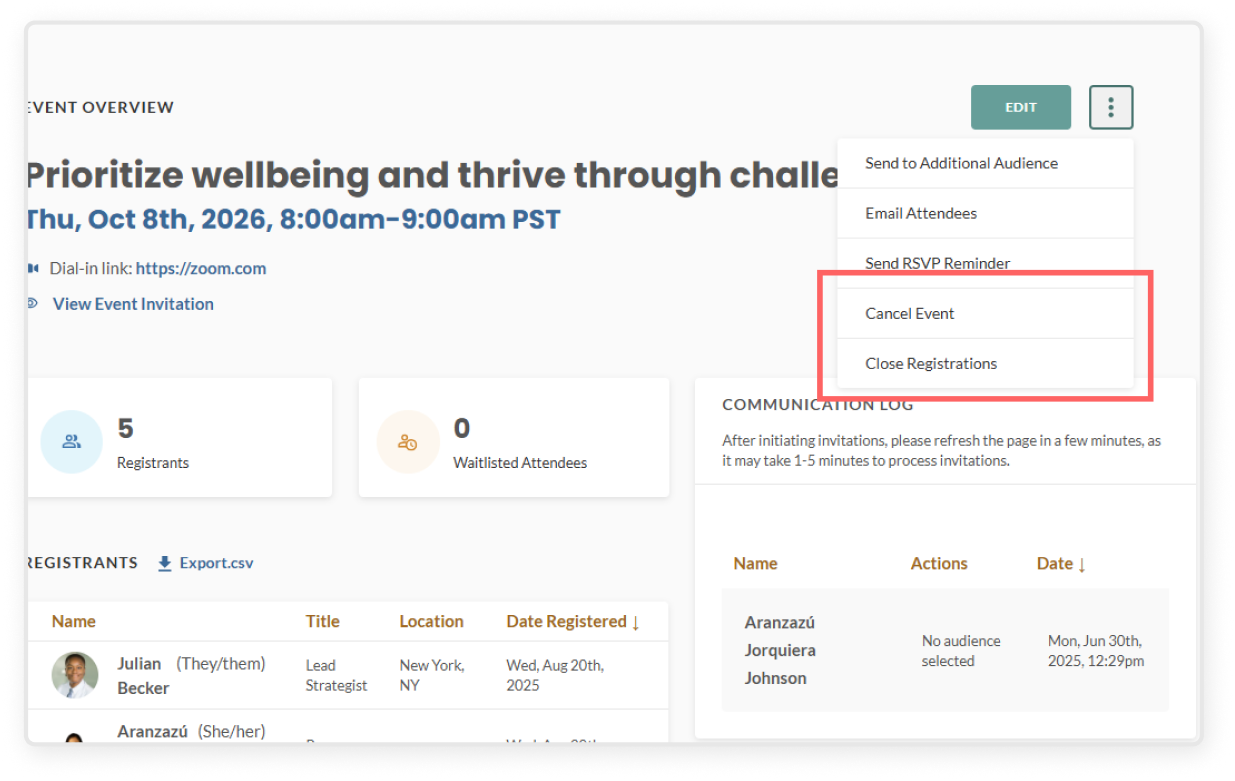
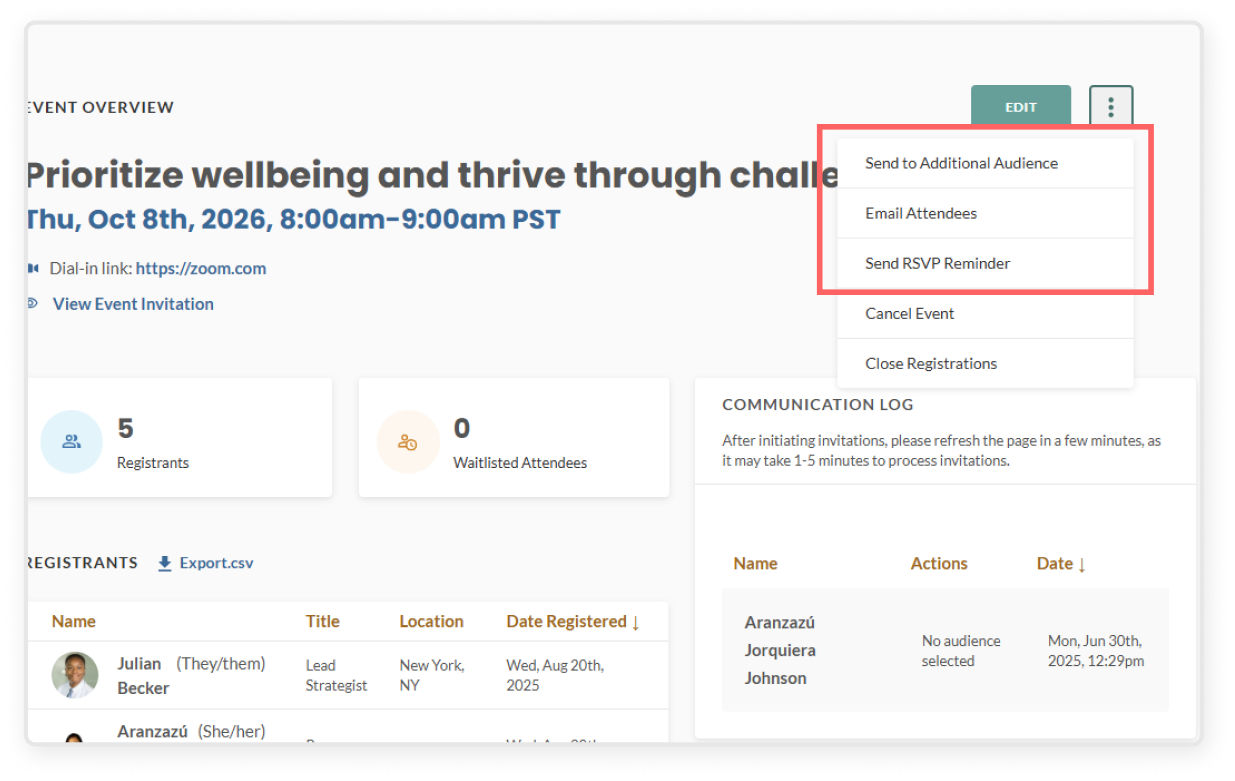
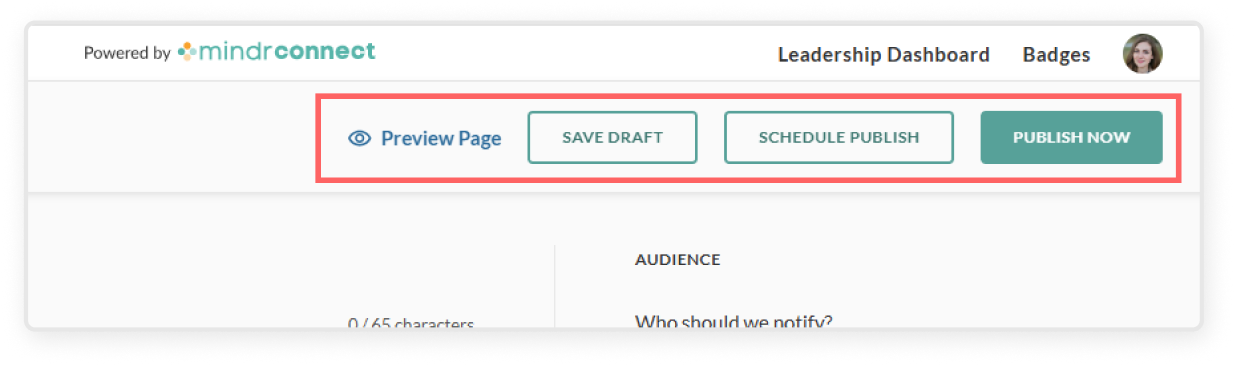
Select the audience you would like to notify about the event in the right sidebar

  • All subscribers sends an email notification to all subscribers of your community
  • Only a subset of users allows you to filter by location, title, department, name, or import a CSV of specific emails to receive notifications. (Learn how it works in the section: “Invite a subset of users to a CTA”)
  • Nobody publishes the CTA to the Mindr Connect dashboard but does not send any email notifications
  • Click Leadership Dashboard in the top right corner
  • Select the community and click Calls to Action on the left sidebar
  • Click the green Create Call to Action button
  • Complete the required fields
    • Title (name of CTA)
    • Subtitle (engaging sub-heading)
    • Deadline to complete (date the CTA will close)
    • Location (dial-in link, physical address, or no location)
    • CTA description 
      • This will be the body of the email and main text of the CTA page, and should include all relevant information and details about the CTA. You have full rich text editing capabilities, such as creating headings, bolding, italicizing, underlining, adding bulletpoint lists, hyperlinks, etc.
    • Upload an image (optional: add image caption)
  • Scroll down to the Additional Details section. These fields are optional, but they help make your CTA more engaging and informative
    • + Add call to action cohosts: You can add co-hosts, which will give that community’s leadership team complete edit access to the CTA, and send an invitation to that group’s subscriber base. Be sure to get permission from the relevant leadership teams before adding cohosts
    • + Add recommended resources: Use this section to add documents or links you want your users to check out. You can drag and drop to reorder the resources using the icon at the front. We recommend including here all the resources linked in the description above.

  • Navigate to the three-dot kebab menu on the meeting overview page. From there, you can select:
    • Email Guests – Send a message to the leaders who are attending the meeting
    • Cancel Meeting – This will cancel the event entirely and remove it from leaders’ dashboards and calendars, and will send a cancellation email to all invited leaders
  • Click Committee Meetings on the left sidebar and then select the Past Meetings tab
  • Click into a specific committee meeting to view the meeting overview dashboard
  • Review the agenda, materials, and meeting minutes

  • Click Leadership Dashboard in the top right corner
  • Select the community and click Committee Meetings on the left sidebar
  • Click the green Create Meeting button
  • Complete all required fields:
    • Title (e.g. Q1 Planning Meeting)
    • Date and time
    • Location (dial-in link or in-person address)
    • Scroll down to the More Options section:
      • + Add agenda: You can add agenda items along with estimated duration and notes. Each item will be attributed to the user who added it.
      • + Add materials for attendees: Use this section to add documents or links you want attendees to check out. You can drag and drop to reorder the materials using the icon at the front.
      • + Add meeting minutes: Before, during, and after the meeting, notes and minutes can be added in this section. Follow-up items can be assigned to specific leaders by selecting their name from the drop down menu
  • Click Save Draft or Publish to add the Committee Meeting to all leaders’ calendars
    • All community leaders will have the ability to continue to edit and add to the meeting, whether it is a draft, published, or a past meeting

Heading 1

Heading 2

Heading 3

Heading 4

Heading 5
Heading 6

Lorem ipsum dolor sit amet, consectetur adipiscing elit, sed do eiusmod tempor incididunt ut labore et dolore magna aliqua. Ut enim ad minim veniam, quis nostrud exercitation ullamco laboris nisi ut aliquip ex ea commodo consequat. Duis aute irure dolor in reprehenderit in voluptate velit esse cillum dolore eu fugiat nulla pariatur.

Block quote

Ordered list

  1. Item 1
  2. Item 2
  3. Item 3

Unordered list

  • Item A
  • Item B
  • Item C

Text link

Bold text

Emphasis

Superscript

Subscript

  • If enabled, this feature will send an automatic welcome email to new employees as they are added to the Mindr Connect platform, explaining how to take key actions within the tool, and providing a link to the main dashboard.

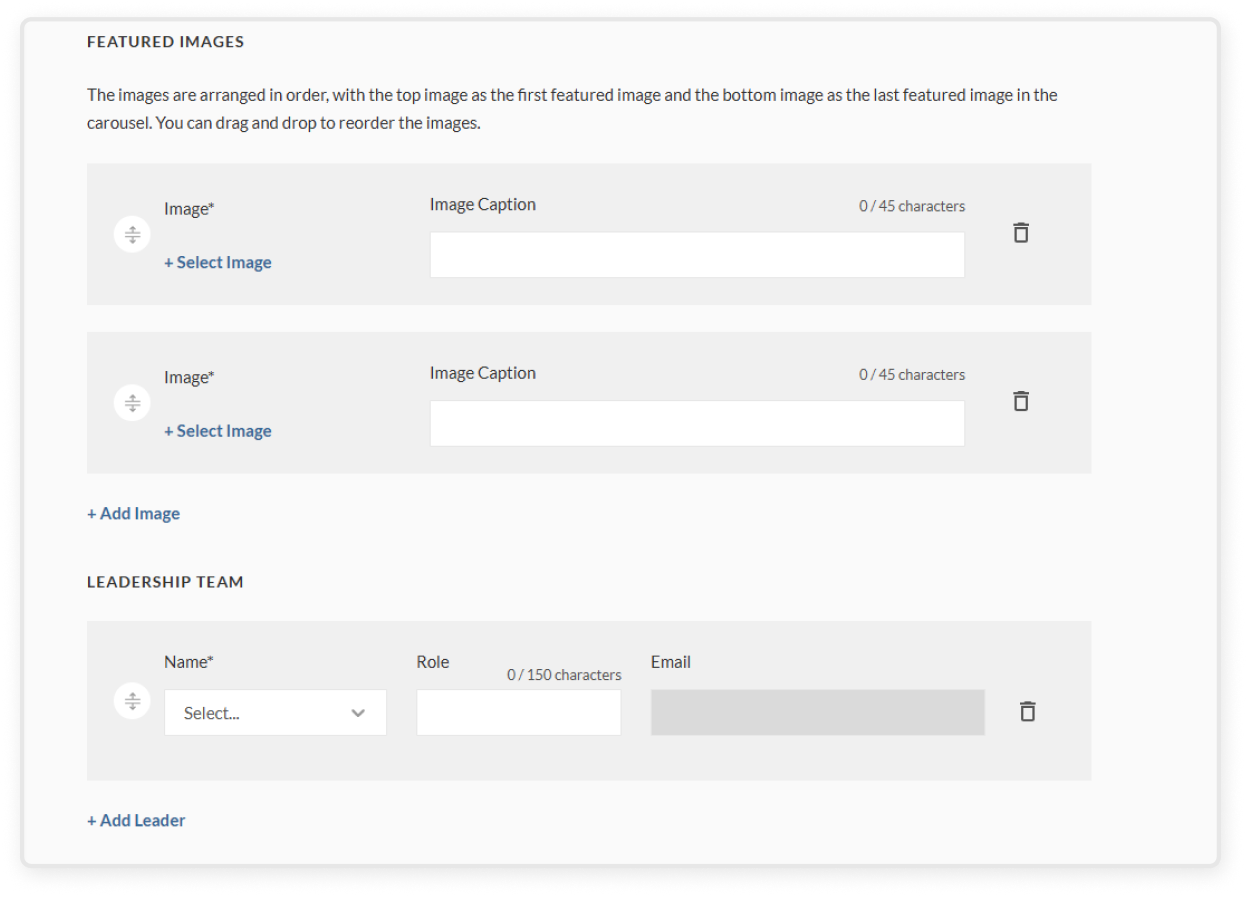
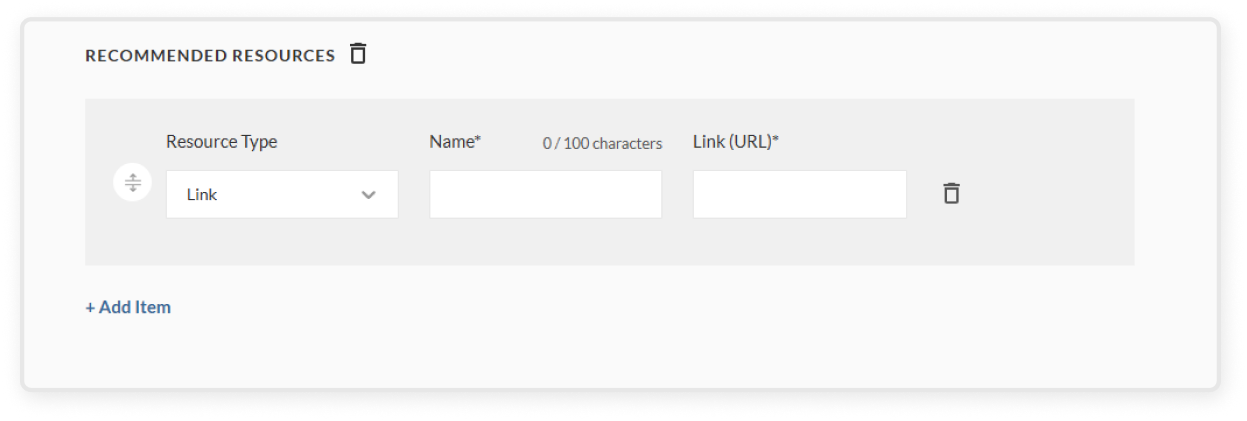
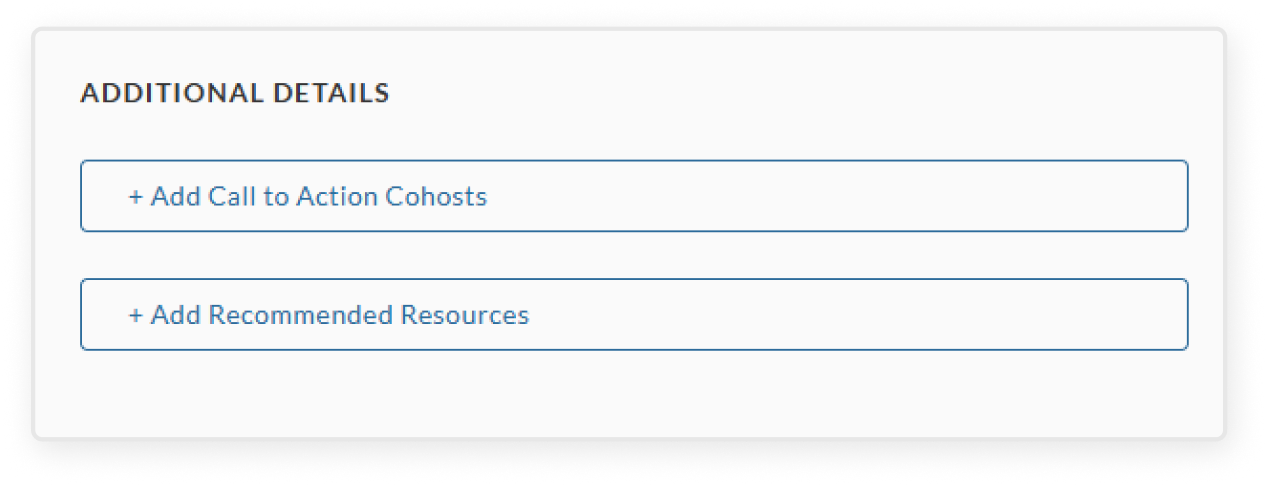
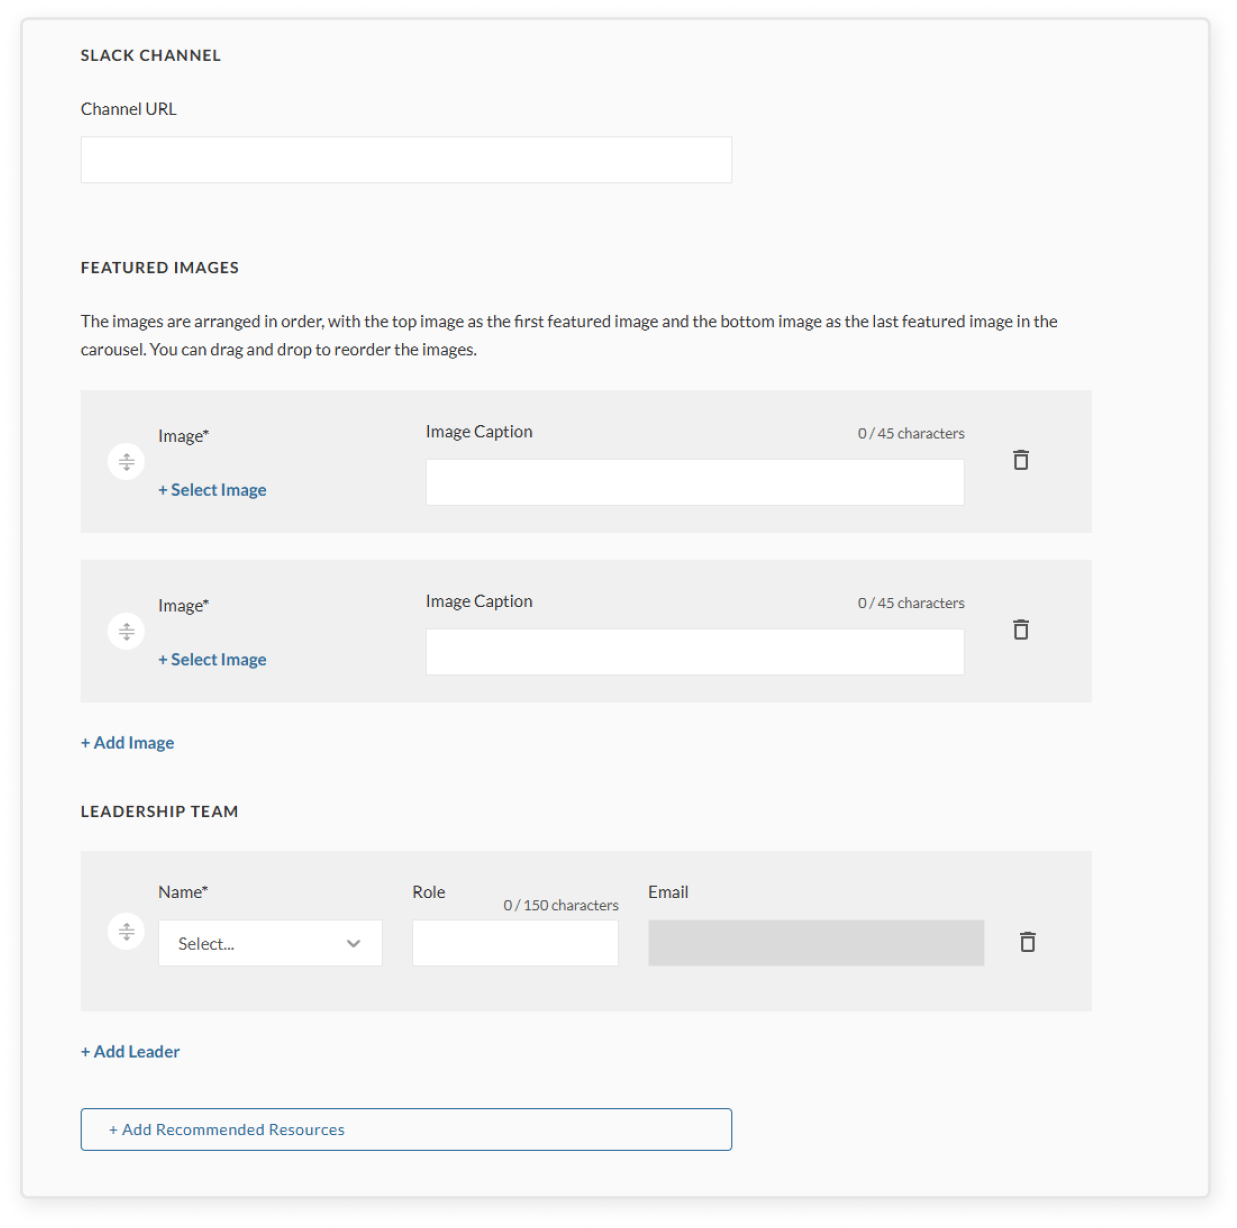
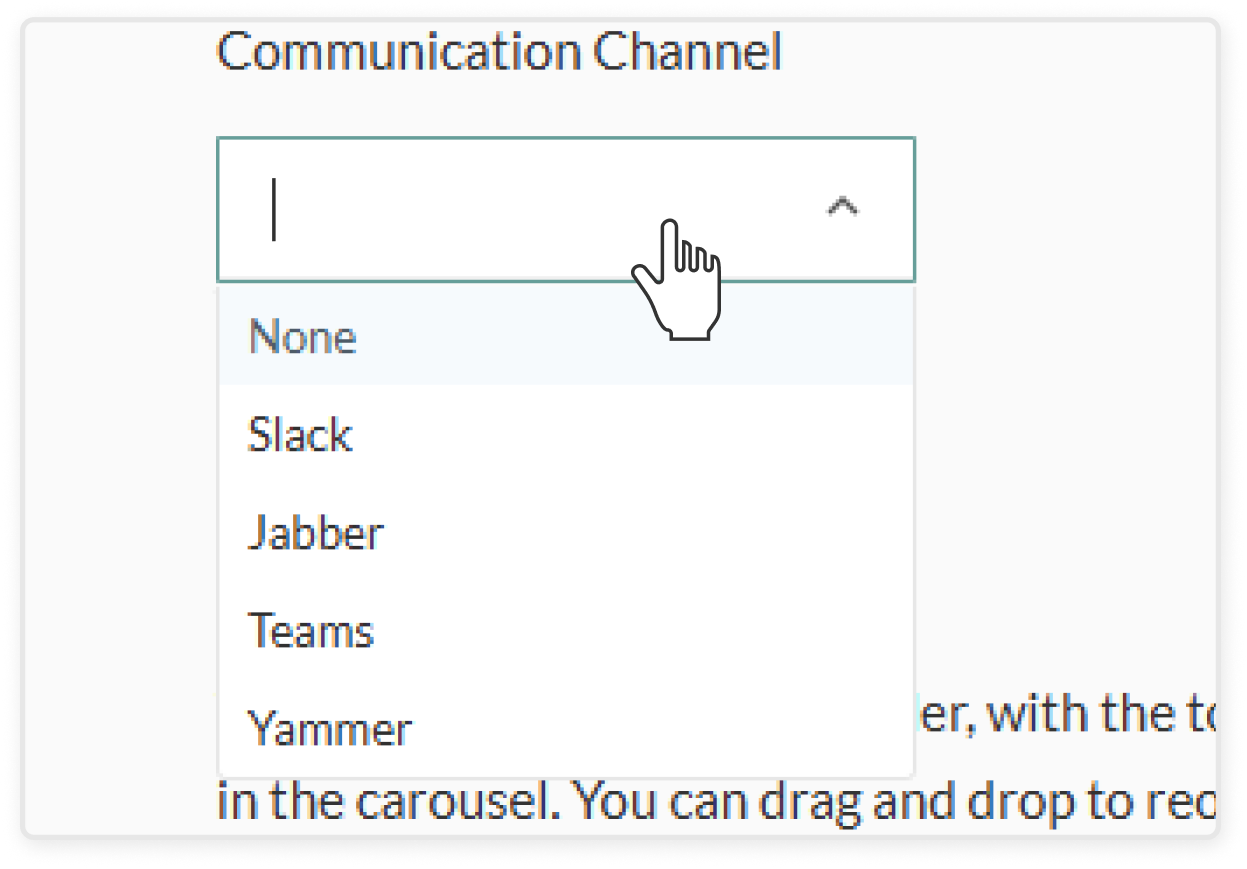
These recommended resources will be at the bottom of the main dashboard of your organization. They will be visible to all users at the organization. To add or edit recommended resources:

  • Click + Add Item or edit an existing item
  • Select the resource type – either a link or a document
  • Enter a name for the resource
  • Depending on the type you selected, either paste a link or upload a file
  • Drag and drop to reorder the resources using the icon at the front

  • Enter the key point of contact’s details. This should be an Organization Admin who can serve as a main point of contact for internal users, and the Mindr team.

  • This tile will only appear if your organization has three or less communities: 
  • If relevant, add the contact information for an Organization Admin who can respond to users’ questions and ideas about culture initiatives. When users click “Get Involved” they will be prompted to send an email to this address.
  • The company-wide digest email is sent automatically to all users, and helps to inform and engage employees who have not yet subscribed to any communities. This email will spotlight upcoming events, current Calls to Action, and ways to get involved across all communities.
  • Select a frequency from the dropdown (Off, Monthly, or Weekly)
  • Designate a recurring date and time for the emails to be delivered (for example, every first Tuesday of the month)
  • Click the green Save button in the top right corner
  • If this feature has been enabled for your organization, you can customize Mindr Connect with your organization’s branding
    • Upload a logo and select a brand color, then use the preview box below to see your selections in real time
  • Once saved, this branding will be visible on the navigation bar and email notifications for all users at your organization
  • In the top right corner, click Settings
  • On the left sidebar, under My Org click Organization Details 
  • Here you can edit all of the details for your organization, including:
    • Company name
    • Name in Mindr
      • Company Name is your official name, while Name in Mindr is the display name shown throughout the platform.
    • Number of employees (at Join Date)
    • Headquarters
  • Microsoft Teams integration is a feature that can be turned on if you want your community’s updates to sync with a Microsoft Teams channel. Once integrated, new events and CTAs will automatically post in your Teams channel. To get started, you can:
    • Go to a community and locate the Microsoft Teams Integration tab in the left sidebar
    • Follow the step-by-step guide to set up a new connection
    • Manage existing connections in the Microsoft Teams Integration tab 
    • Remove a connection at any time to disconnect it from both the Teams channel and your community. Note: The Webhook URL cannot be edited once created.

  • You can remove a community by archiving it. Leaders and subscribers will no longer be able to see this community. The only users who will have access to view the archived community are Org Admins via the Archived Communities tab.
  • On the left sidebar, under Admin Tools click the Community Management 
  • Go to the Active Communities tab
  • Click Edit on a community in the table, or if you're already in a community managing events, CTAs, or others, you can click Community Details in the left sidebar under Community Management
  • Click the trash can icon to the right of the green Save button. Read the message in the pop-up modal confirming your selection, then click the green Archive button
  • Once archived, data such as the community details, past events, CTAs, and reports will be accessible in the Archived Communities tab
  • On the left sidebar, under Admin Tools click the Community Management 
  • Go to the Active Communities tab
  • Click Edit on a community within the table
    • If you're already in a specific community, you can click Community Details in the left sidebar under Community Management
  • Make your changes and click Save to update the page
  • Click Preview page to view how the community page will appear to users
  • Double-check all details, including leadership and resources, before publishing
  • Click Create Community to publish. This will make the community visible and accessible to all users on Mindr Connect.
  • Make sure the new community appears under the Active Communities tab
  • In the top right corner, click your Settings
  • On the left sidebar, under Admin Tools click the Community Management 
  • Click the green Create Community button
  • Fill out required fields and upload images:
    • Add the community name and an engaging subtitle
    • Write a short mission statement, including any important details you’d like included on the community homepage, you can use rich text formatting for this section, including adding headings and links.
    • Upload a logo for this specific community
    • Add a thumbnail image that will appear on the main Mindr Connect dashboard 
    • Upload a banner image that will appear at the top of the community detail page
    • Upload featured images to give the page more visual context (this can be past events, marketing materials, or stock images). You can drag and drop to reorder the images using the icon at the front.
      • You must upload at least two images in order to save your progress and proceed with creating a community.
    • Assign a leadership team by adding one or more leaders who will help manage the community. You can drag and drop to reorder the leaders using the icon at the front.
      • If leaders haven’t been selected yet, you can add yourself or another point of contact in the meantime
      • By adding someone to the leadership team, they become a Community Leader. Community Leaders can:
        • Edit the community details
        • Create events and CTAs, and publish them to community subscribers
        • Create committee meetings with other leaders
        • View community reports that show subscriber engagement and activity
  • Add optional but helpful details:
    • Add a communication channel if there are other places where your community connects, such as Slack or Microsoft Teams
    • + Add recommended resources that users can view or download from your Community’s page. You can drag and drop to reorder the resources using the icon at the front.
    • If you want everyone in your organization to be added automatically, toggle on “Should all users be automatically subscribed to this community?”
  • Please note that during integration, a SCIM import will be set up to automatically add and remove users. However, a manual option is still available for adding new users:
    • In the User Management, click the Invite New User button in the top right corner
      • Fill out the required fields
        • First name and last name
        • Pronouns
        • Email
        • Helpful information fields include: 
          • Title
          • Department
          • Location
          • Role (Employee or Organization Admin)
      • When you’re ready, click Invite to send the invitation. The user will need to accept it before they’re added to your organization on the platform.
  • In the top right corner, click your settings
  • On the left sidebar, under My Org, click the User Management 
  • From there, you can view each user’s details – including their name, email, date joined, user role, location, and status
    • Invited means they haven’t activated their account yet
    • Active means they have access to the Mindr Connect platform
    • Deactivated means that they have been removed from the Mindr Connect platform (most often meaning they have left the organization)
  • Use the search bar or click specific column names to easily find and sort through users

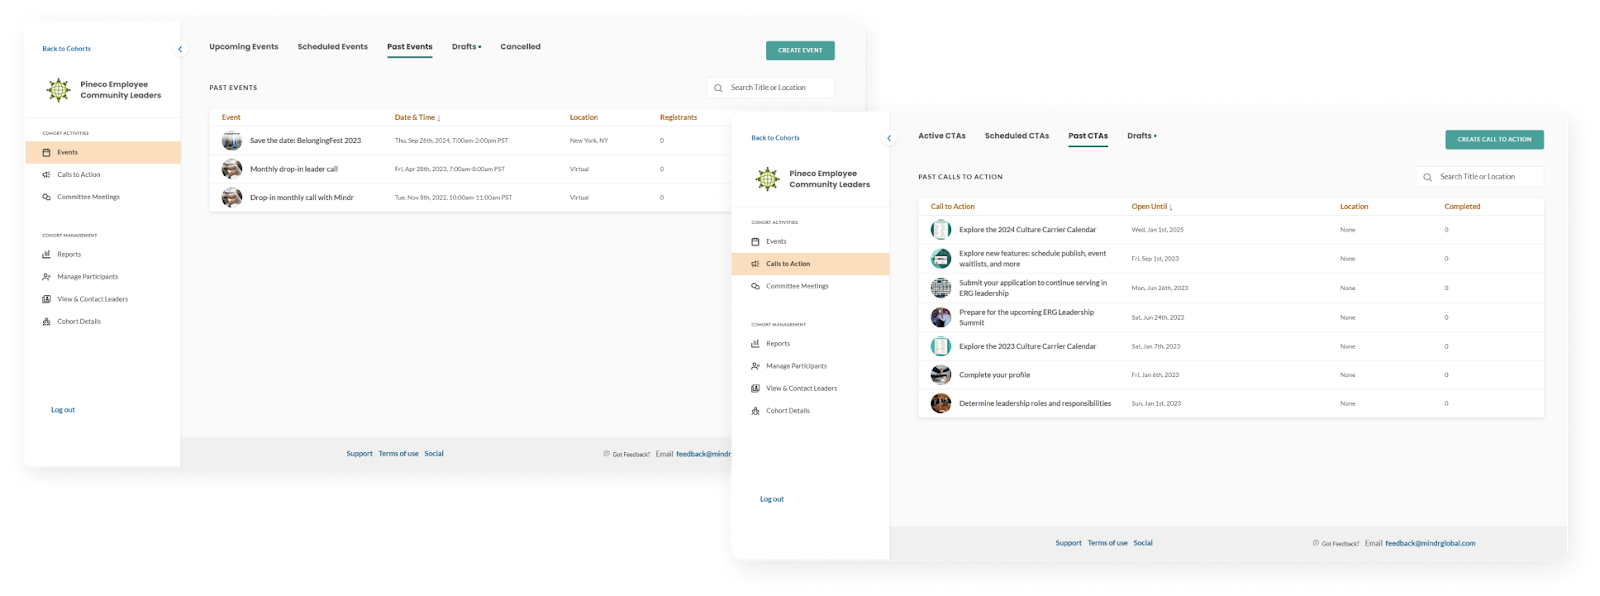
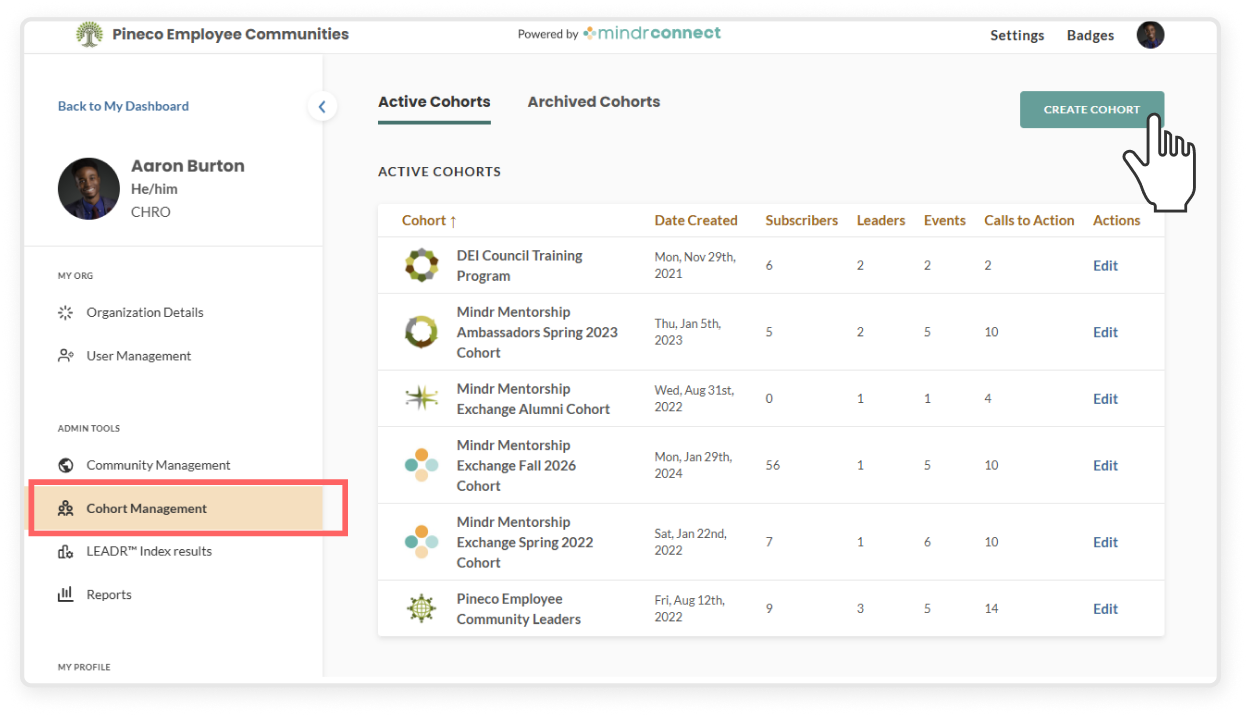
Events and CTAs can be created and published within Cohorts, just like Communities. However, with Cohorts, this content will only be visible to users who have been added to the cohort by an admin.

  • Within the specific cohort, click Manage participants
    • Filter the participant list by locations, title, department, or even specific names if necessary
  • Click the three-dot kebab menu and select Batch Email
  • Compose your message, including a subject line, body text, and attachments as relevant
  • Click the green Send button to deliver the email to selected participants
  • Click into the specific cohort, then select Manage Participants on the left sidebar
  • If you’d like to upload a CSV file of participants for a bulk import, click the three-dot kebab menu and select Bulk upload
    • Download the example CSV to see the required format
    • Create a spreadsheet with participant email addresses
    • Click + Select file and upload the CSV file
    • Click the green Import button to add all users
    • Review the import to ensure all users have been added, and address any errors
  • To add users individually, click the green Add Participants button and search for users by name or email address
    • Select as many users as needed, then click the green Add participants button
  • On the left sidebar, under Admin Tools click the Cohort Management 
  • Go to the Active Cohort tab
  • Click Edit on a cohort in the table, or if you're already in a cohort managing events, CTAs, or others, you can click Cohort Details in the left sidebar under Cohort Management
  • Make your changes and click Save to update the page
  • Click Preview Page to view how the cohort page will appear to users
  • Double-check all details, including leadership and resources
  • Click Create Cohort to publish
  • Make sure the new cohort appears under the Active Cohorts tab
  • In the top right corner, click Settings
  • On the left sidebar, under Admin Tools click Cohort Management
  • Click the green Create Cohort button
  • Fill out required info and upload images
    • Add the cohort name, subtitle, and description 
    • Upload a logo that will appear on the cohort card and detail page
    • Add a thumbnail image that shows on the dashboard 
    • Upload a banner image that appears at the top of the cohort detail page
    • Upload featured images to give the page more visual context
    • Assign a leadership team by adding one or more leaders who will help manage the cohort. If leaders have not been identified yet, add yourself or another point of contact in the meantime
  • Add optional but helpful details
    • Add communication channel info if there are other places where your cohort connects, such as Slack or Microsoft Teams
    • Include recommended resources that users can view or download. You can drag and drop to reorder the resources using the icon at the front.
    • Enable Yearbook View if you want participants to see who else is in the cohort

  • In the top right corner, click your Settings 
  • In the left sidebar under Admin Tools, click Reports
  • In the Report Type drop down, select the Past Events report type
  • You can click into individual events to see specific feedback, including satisfaction rates, comments from attendees, and questions submitted in advance.
  • NOTE: For data security purposes, by default reports cannot be exported. If your organization has agreed to additional data privacy terms, the export feature may be enabled. Please reach out to your main Organization Admin or the Mindr team with any questions.
  • By default, the Past Events report only shows events with surveys. Use the toggle to show all past events, including those without surveys, to access the rest of the event reports.

  • In the top right corner, click your Settings 
  • In the left sidebar under Admin Tools, click Reports
  • In the Report Type drop down, select the type of report you’d like to view
    • Engagement (Communities) provides a list of all subscribers across all communities, and their activity (number of events attended, calls to action completed, etc.)
    • Engagement (Cohorts) provides the same information as above, but for private cohorts.
    • Badges provides a list of all users and the engagement badges they have earned. You can use this information to identify the changemakers in your organization, so that you can tap into their passion and contributions to building a culture of belonging.
    • Past events (Communities) provides a list of past events hosted across all communities, including number of registrants, pre-submitted questions, and survey responses. This report can be filtered to include all events, or those just with survey responses.
    • Past events (Cohorts) provides the same information as above, but for events hosted within private cohorts
    • Past calls to action (Communities) provides a list of all previously published CTAs, including number of users who have marked the CTA as “completed”
    • Past calls to action (Cohorts) provides the same information as above but for CTAs published within private cohorts

If enabled by your organization, you can view the results of users who have taken Mindr’s LEADR™ Assessment

  • In the top right corner, click Settings
  • On the left sidebar under Admin Tools, click LEADR™ Index Results
  • You can filter the diagram and profiles by selecting one or more locations, titles, or departments. The LEADR™ diagram and profiles will update based on your selections.
    • LEADR™ diagram shows the average score for each leadership dimension at your organization. Hover over any pie slice to see how many employees have that leadership dimension in their top two strengths.
    • LEADR™ Profiles on the right show how many employees fall into each leadership profile after taking the assessment. Click on a profile icon to learn more about the strengths of that profile.
  • Read LEADR Index page to learn more about the framework, assessment, and profiles.