All users

Attending events

Discover events, register, manage waitlists, and invite others to attend

How to register for events

  • If you are subscribed to the community hosting the event, you may receive an email invitation. From that email, you can click the green Register button
  • If you are logged into Mindr Connect, find the event you want to attend
    • You can find the three events coming up next on My Dashboard, and register by clicking the green “+” button
    • Or go to the Events tab to see all upcoming events, and click the green “+” button
    • You can also click into the specific event page to see all event details, and click the green Register button in the top right of the banner
  • You may be prompted to submit questions for the speakers in advance
    • You can submit a question right away during registration. Make sure to click Submit.
    • Or you can head to the event page to submit a question by clicking the Submit Questions button at the top right corner, at any point before the event.
  • After registering, you will receive an email confirmation and the event will be automatically added to your calendar
  • 🔔 NOTE: Automatically registered: In some cases, leaders may automatically register all community subscribers for an event. If that happens, you'll get a confirmation email and  the event will be added to your calendar. You don't need to take any action unless you want to cancel your registration.

How to cancel your event registration

  • If you are logged into Mindr Connect, you can head to the Events tab to see all upcoming events 
  • From there, click into the event and hit the transparent Cancel Registration button to unregister. Then, click Confirm. The event will also be removed from your calendar.
  • 🔔 NOTE: If there's an active waitlist for the event, canceling your registration will free up your spot, and someone on the waitlist may take your place

How to apply filters to find relevant events

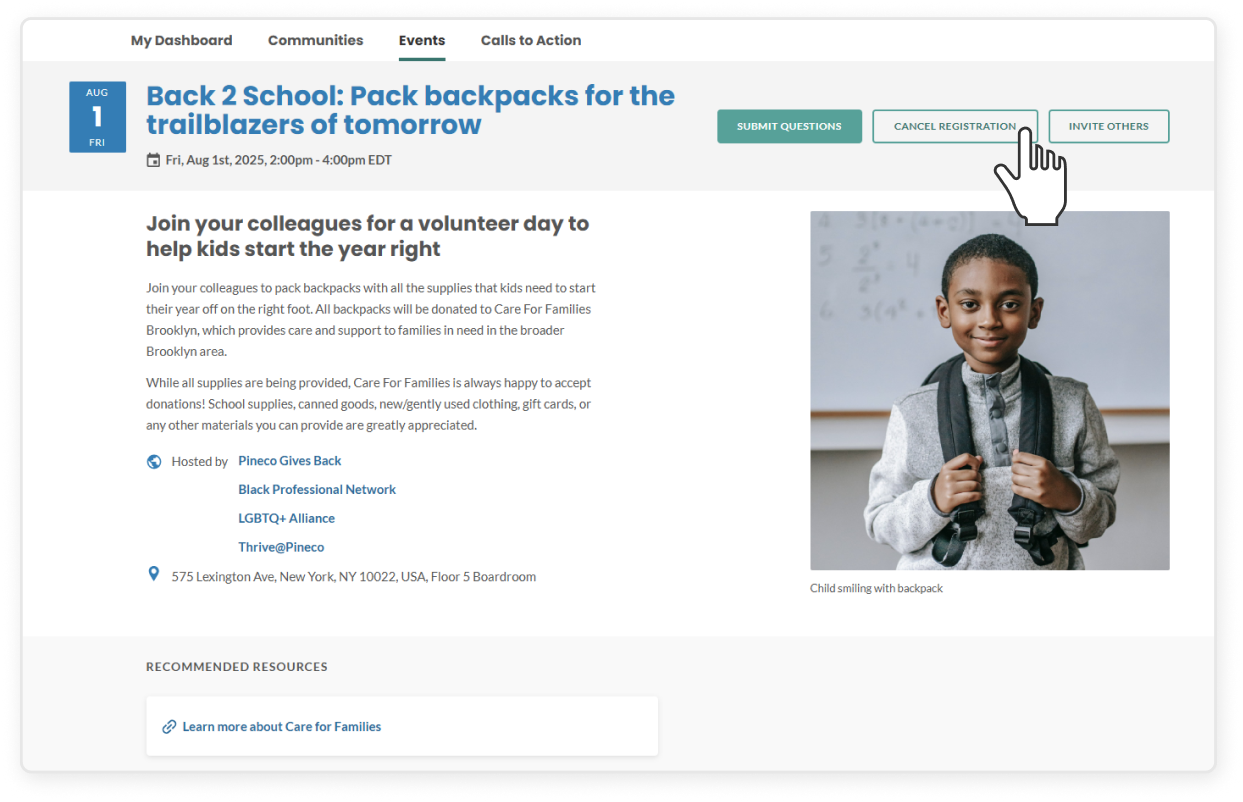
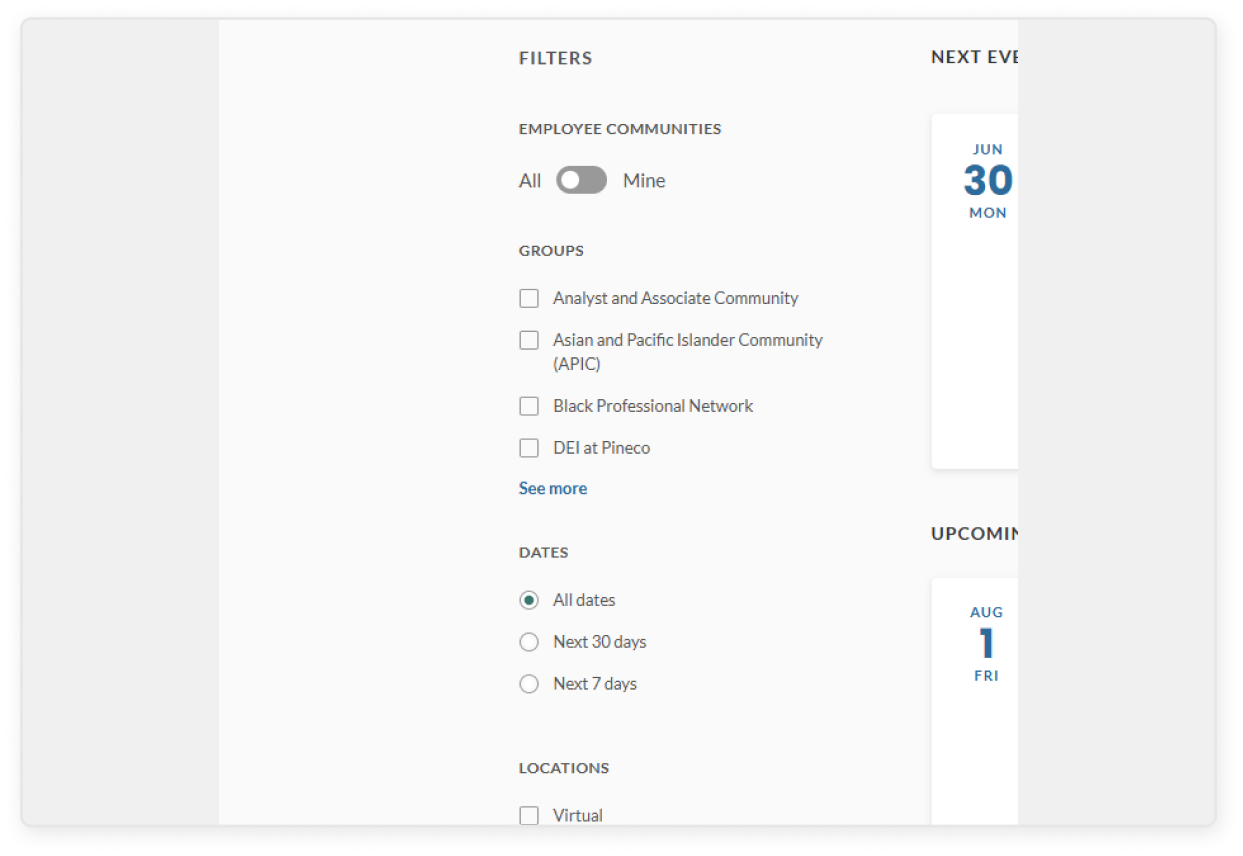
From your dashboard, click the Events tab and use the filters on the left side:

  • Toggle between “All” and “Mine” – Switching to “Mine” will show events hosted by communities you’re subscribed to
  • Filter by Groups – Select one or more communities to only see events from those specific groups
  • Filter by Dates – Choose a date range to narrow it down. Options include All dates, Next 30 days, or Next 7 days 
  • Filter by Locations – Pick one or more locations to view events happening in specific areas

How to join or leave a waitlist

  • If you're on the My Dashboard or Events tab, and an event is full or registration has closed, the event card will show Join Waitlist instead of the usual “+” button
  • If you click into the event page, you’ll see a Join Waitlist button instead of the green Register button
  • Once you're on the waitlist, you'll automatically receive an email if a spot opens up
  • If you no longer want to stay on the waitlist, you can go back to the event page from the My Dashboard or Events tab, click into the event, and click Remove from Waitlist

When a waitlist spot opens up

  • If you’re on the waitlist and a spot opens, everyone on the waitlist will receive the email at the same time
  • If you want to attend, click Register in the email as soon as possible to secure your spot, as spots are filled on a first-come first-serve basis

Invite colleagues to event

  • Navigate to the Events tab on the top menu of your dashboard
  • Select the event you'd like to invite colleagues to
  • In the top right corner of the banner, click the transparent Invite Others button
  • In the text box, begin typing your colleague's name or email
  • Select your colleague's auto-populated profile
  • Add as many colleagues as you would like 
  • Click the green Send Invitations button, and an email will be sent to their inbox

Earn badges through event attendance

  • You can earn two badges by attending events:
    • Register for 5 events to earn the “Supporter” badge
    • Register for 10 or more events to earn the “Advocate” badge
  • In the top navigation bar, click Badges to view all available badges
  • To see each individual badge in a larger view, click the relevant View Badge button
  • Once a badge has been earned, you can share your achievement on LinkedIn by clicking Share Badge
  • You can learn more about each badge here